Making a Rock Hand Hold for Your Bow Drill Kit

Making a rock hand hold like these starts with finding the right stone.

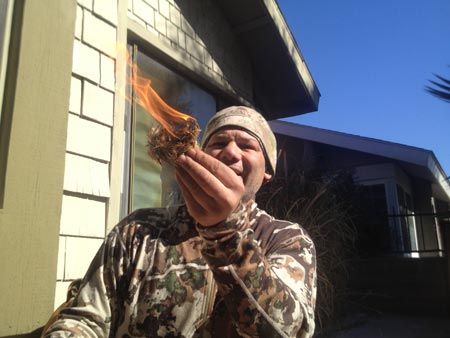
This is my latest tutorial. You’ve got written directions and a video on making a rock handhold for your bow drill kit.

Watch the video above to see me make a rock hand hold for a bow drill kit

Making a rock hand hold for your bow drill kit is a whole lot easier if you find a rock that already has a depression in it. In the video above, I take you from gathering raw rocks to making a hand hold.

You need to watch the video to see where to look for your rocks. I also show you how I choose the rocks. And you’ll see exactly how to grind the rock into a usable hand hold.

I have been all over the world making friction fires. In my travels I’ve found that the hand drill is a lot more common than the bow drill. The bow drill is a lot more complex and has more stuff to either find or carry with you.

The bow drill takes five pieces: 1) the bow, 2) the spindle, 3) the fireboard, 4) cordage and a 5) handhold. But, the hand drill only takes two: 1) the spindle and 2) a fire board.

My bi survival kit includes a rock hand hold. Not something you see most survivalists carry.
I have a tiny rock hand hold in my big survival kit. Having it saves me a lot of time in the woods.

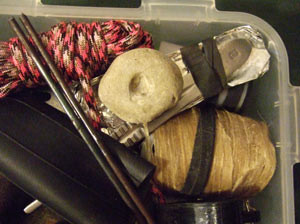
There are two main drawbacks of the bow drill compared to the hand drill: Cordage that is durable enough to use on a bow drill is often hard to find. And finding a suitable hand hold can be even harder. In fact, making a hand hold is such a bother that I have a small hand hold in my big survival kit.

Most of us can gather materials in the wilderness and bring them back home to work with. So, I’m going to write this post with those people in mind. If that’s the case for you, beginning your friction fire education with the bow drill probably makes the most sense.

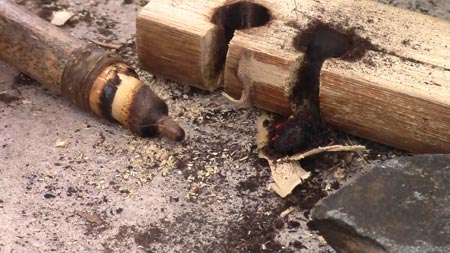
The most time consuming process of making a rock hand hold is grinding the socket. I’ve found that using another stone and simply spinning it in the hand hold is the best method. I’ve seen people use a stone point anchored in the end of a hand drill or bow drill spindle. That works well, but I’ve found it’s hard to anchor my stone point and mine always get crooked when I apply a lot of pressure.

Making a rock hand hold like these starts with finding the right stone.
I’ve had the dark hand hold for over 20 years. Notice that you don’t need deep holes in your handholds.

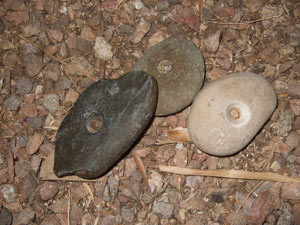
There are two important things to consider when selecting rocks to make a stone hand hold with. The first thing you want to look for is a rock that already has a hole in it. Then all you have to do is make the hole bigger.

The second big thing to look for is a soft rock. You’re going to be doing a lot of grinding and you want the grinding process to go as quickly as possible. One of the best stones I’ve found for making a quick (under an hour) hand hold is hard, fine grained sandstone. Sandstone is easy to put a hole into and if you find a rock with really fine grain, it won’t wear your spindle down.

There are other things you can use to make hand holds for your bow drill kit. As I write articles about them, I’ll add those links here.

This link will take you to the main fire page with all my fires posts.

How to Start a Fire with Sticks

In this post I’m going to show you how to start a fire with sticks and a string. When you start your first fire by rubbing two sticks together, you are going to be amazed. It’s an incredible experience. Even after starting thousands of fires this way, I’m still in awe every time I do it.

Making a bow drill kit from start to finish

Watch the video above on how to make a fire with sticks

The video here is excellent. I go over a lot of detail in the video and you need to watch it.
Here are some important points that aren’t obvious:

  • When loading the spindle in the string, hold the spindle alongside the string at first, then twist it around the string.
  • The initial placement of the spindle in the fireboard is critical. Make sure you go in about 3/4 the thickness of your spindle.
  • Cut your notch just short of the middle of your circle.
  • Make the side of your notch smooth. Otherwise the powder will get hung up on the jagged edges of the notch.
  • Use your bow hand to make slight adjustments to the string and vary the tightness.

Primitive fire starting is all about using friction to create heat. You need to get most woods about 750-800 degrees before they will smolder. What you do with friction fires is spin or rub two sticks together, build up a little pile of powdered wood, and once that powder gets to 750 degrees, it forms an ember (or coal).

You then put the coal into a tinder bundle and blow it into flame. Getting fine, bone-dry tinder is really important when picking out your tinder bundle material. (Here’s a video on finding tinder bundle material in the desert.) The coal is very similar to the end of a burning cigarette, and you can practice igniting tinder bundles using cigarettes.

bow drill parts
Three of the five parts to a bow drill kit. Missing are the bow and string.

Parts to a bow drill kit and a hand drill kit

The Bow Drill Kit

Probably the easiest way to start a friction fire at home when you have lots of time and materials is using a bow drill. A bow drill kit has 5 pieces to it. You’ll need:

  • A bow
  • A string
  • A hand hold
  • A spindle and
  • A fireboard.

In reality, finding all five pieces in the wilderness can be difficult. That’s why I prefer…

The Hand Drill Kit

In a real survival situation the hand drill will probably be your first choice since you only need two sticks:

  • A spindle and
  • A fireboard.

But, since I’m assuming you are going to start out practicing when your life doesn’t depend on success, I’m going to begin with the bow drill fire. If you want to get a bow drill kit from me, let me know and I’ll sell you one.

blowing an ember into flame with a bow drill kit
Starting a fire with sticks feels like a miracle every time you do it.

Technique when first learning to how to start a fire with sticks

Technique is huge when starting a fire with a bow drill. First of all, I’d suggest reviewing the beginning of video on this page and again at 12:35 so you can see how I’m positioned.

As you re-watch the video, note the following things, because they are really important:

  • The hand that holds the handhold is locked against my shin at the wrist. This keeps the spindle steady in the socket.
  • My body is directly over the spindle. This allows me to put pressure down by leaning down with my body and not pushing down with my arm.
  • I use as much of the bow as possible, going from end to end. This creates more heat.
  • The arm that holds the bow stays pretty much in the same position throughout each stroke. Keep the bow straight and level by adjusting the angle of the wrist holding the bow. If you do this right, the string will stay pretty much in the same place on the spindle during each bow stroke.
  • The foot holding the fireboard is bare. Being barefoot is important because you want to be able to feel what is going on with your fireboard. You have to adjust for wobbling and keep it steady.

Those are the key factors when you are first learning how to make a fire with sticks. It’s going to take some practice though. It took me over 1 1/2 years to get a coal. Just stick with it.

And of course, if you have any questions about how to start a fire with sticks, either email me or use the contact form and I’ll help you out.

For all my posts on fire, go to the “How to Make a Fire” page.