How to Make a Primitive Fish Hook from Deer Bone

How to Make a Primitive Fish Hook from Deer Nasal Bone

primitive bone fish hook from deer maxilla
A bone fishing hook made from the upper jaw of a deer skull. These can be made in about 20 minutes once you know how to make a primitive fish hook from deer bone!

I’ve had a few requests from people who want to know how to make a primitive fish hook from bone. I have seen them made out of deer toe bones (phalanges), but that style takes a lot of work. The way I show you here, making them out of a deer nasal bone, is much easier since the bone doesn’t need much work to get it the right shape. Here is another article on making these.

step by step making of a deer toe bone fishing hook
This image of David Wescott’s hooks shows the progression of making hooks from deer toe bones. It’s a lot of work compared to the hook I show you here.

Step One in Making a Fish Hook from Deer Bone

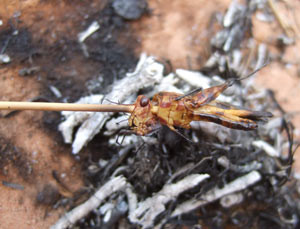
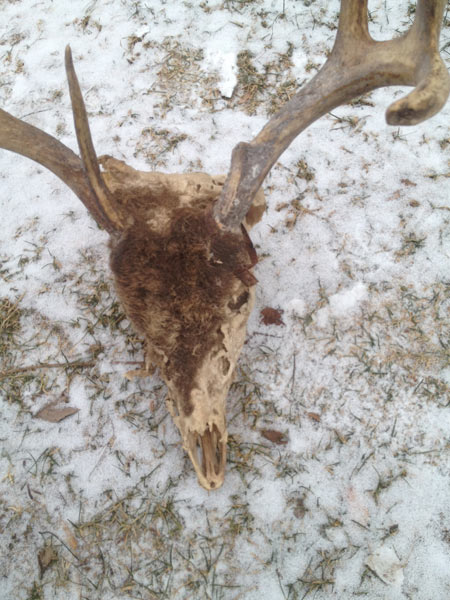
Often the hardest thing to do when you’re ready to make a fishing hook from deer bone is finding a deer head. Here in Wisconsin there are a lot of roadkill deer and I remember where they are so I can come back a few months later after the scavengers have picked the head clean. You can also get heads during hunting season from butchers or hunters.

The part of the head that you want is the end of the upper jaw. Since it’s kind of confusing where the bone you want is, the pictures here zoom in on the correct bone, which is actually the maxilla.

Deer skull with exposed maxilla
This deer head from a roadkill has been eaten away enough that the nasal bone is exposed.
closeup of a deer maxilla used to make a fish hook
A closer look at the end of the upper jaw… the part you want for your fish hook.

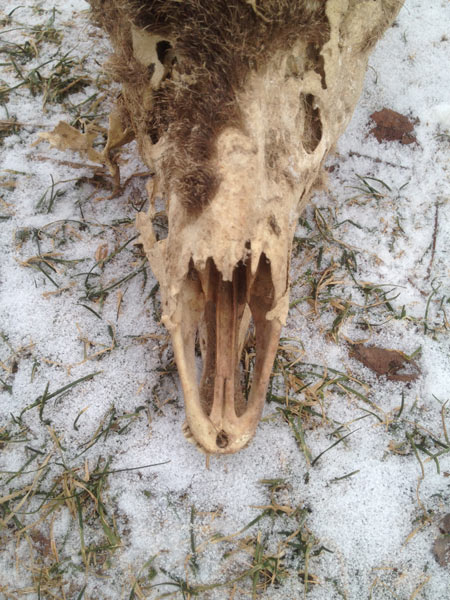
Step Two in Making a Primitive Fish Hook from Deer Bone

You need to remove about 3″-4″ (7.5-10cm) of the end of the upper jaw for your hook. I used a hatchet to carefully chop this bone off, but if you do it with blunt force like I did here, be careful! This maxilla bone is fragile and can shatter easily. It’s much safer to saw the bone off the skull. Or, you can notch the bone and snap it off at your notches.

how to make a primitive fish hook cutting off the maxilla
I carefully chopped the end of the upper jaw bone off with a hatchet, but it’s better to use a saw to get the bone off the rest of the skull.
maxilla taken off the skull to be made into a primitive fish hook
The end of the maxilla fish hook after a bit of cleaning. Note that since I hit this with the hatchet, I only have one good side left.

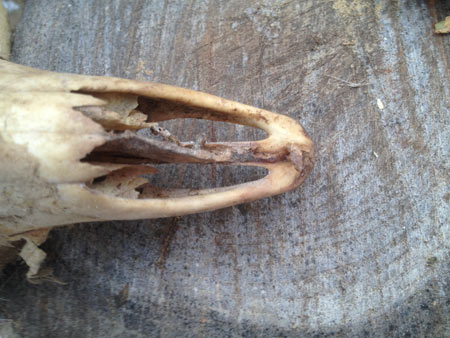
Step Three in How to Make a Fish Hook from Deer Bone

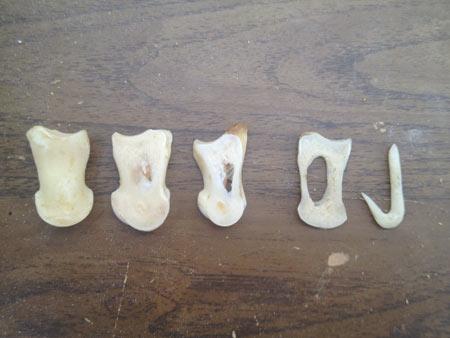
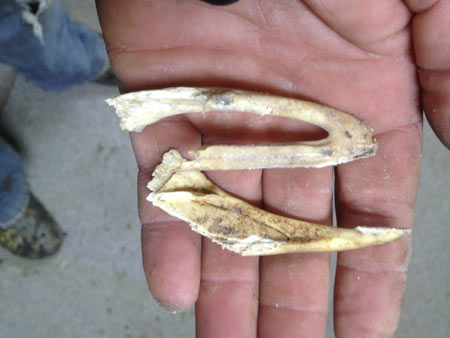
Now that you have the tip of the upper jaw bone off the head, decide which side of the bone has the best hook in it. The two sides are often symmetrical, but if you smacked it with something, you might only have one good side left!

Cut through the center of the little bone in the middle so that you save your good side.

cutting the deer jaw bone to get a good fish hook
When making a fish hook from a deer jaw bone, cut off the bad side of the hook.

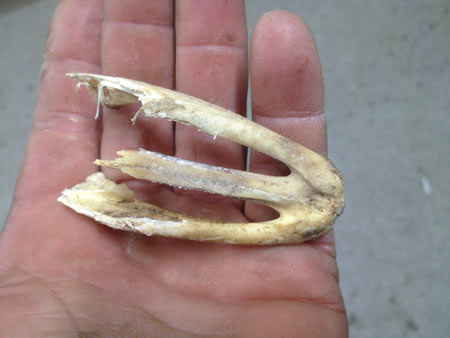
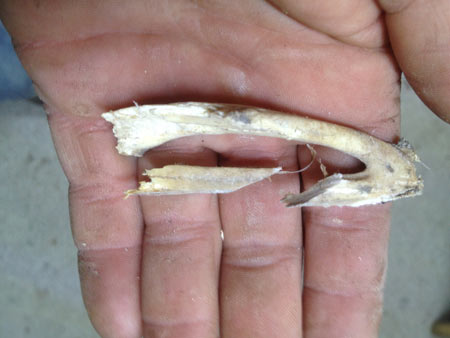
Step Four in How to Make a Primitive Fish Hook from Deer Bone

Cut the middle bone off at an angle. Make sure you leave enough bone to shape a hook out of. I cut the one in the picture off too short and had to start over with a whole new deer head to show you a good finished hook!

cut the fish hook off at the right length
Cut the part of the bone off to get a good shape to your hook. I cut this one off too short and had to start over to finish this tutorial.

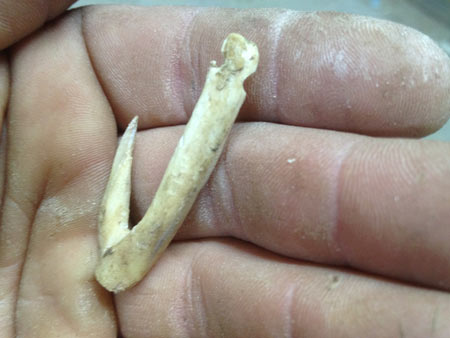
Step Five in How to Make a Fish Hook from Deer Bone

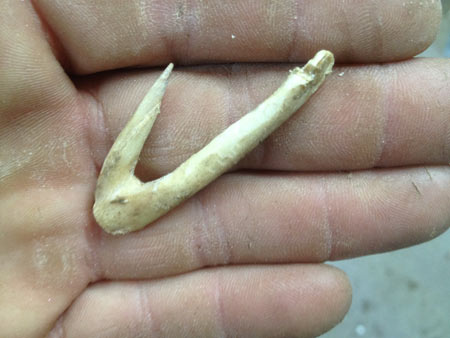
Shape, thin and sharpen the hook. Bone isn’t nearly as strong as steel, so your finished hook is going to be bulky compared to store-bought hooks.

I put little notches in the hook’s shank to hold the string. And I’m not sure if it really matters, but I tie the string on so the knot is exactly in line with the hook. My thought here is that when I pull the line, the hook will pivot at the tie-point and catch better, but I really don’t know if this is true or not. I do hook a lot of fish though.

last step in how to make a primitive fish hook from deer bone is to shape and thin the hook
A finished fish hook from a deer bone. I make my shanks thick so they are stronger.

Thickness is a tradeoff between strength and wanting a small hook the fish doesn’t feel. In my experience, it’s better to error on the side of bigger and stronger. It’s awful losing a fish because your hook snaps! I often fish using offal from mammals that I’ve trapped, and I bury the hook in a mass of meat. Fish like catfish will suck the whole thing in with no problem. Panfish baited with worms are a different story though, they steal my bait almost every time!

I’ve tried to put a barb in these hooks but the hooks have broken off below the barb where they’re thin, so I no longer put a barb on them. You just have to let the fish take the hook down to its stomach, or keep constant pressure on the line when bringing the fish in to land it.

Learning how to make a primitive fish hook from deer bone like this is really easy and if you have an extra deer head laying around, making a fishhook from bone is a fun little project!

I love getting comments, so if you have questions or have ideas, let me know in the comments below.

Go here to check out more articles on finding survival food.

Eating Insects in a Survival Situation

Edible insects at a market in Southeast Asia.
In Southeast Asia, eating insects is normal. This is at a typical market.

Eating insects isn’t all that popular in the United States, but I’ve eaten a lot of bugs in my travels. It’s interesting that in the US we only think of eating insects in survival situations, but arthropods are served as main dishes or side dishes in many countries.

When I taught high school biology back in Wisconsin, I had one of my classes make mealworm cookies. (I think the Home Economics teacher is still pissed at me for using her ovens.) I got the idea from the Food Insects Newsletter, which is no longer published, but the archive is in the link above. I can’t say the lesson was a big hit, but some kids really liked them. It opened the kids’ horizons just a little bit. I still get comments about that 15 years later.

I’m fortunate that as a kid out on survival stays I used to eat slugs and worms because I didn’t know what else to eat. I say “fortunate” because after eating chewy, gritty, hair covered earthworms, eating insects seems like a treat. They are delicious! They taste great. And sometimes when you bite into one, you get an explosion of flavor. It’s incredible.

Disadvantages to Eating Insects in a Survival Situation

One drawback to eating insects is that they almost always have to be cooked. I’ve seen people eat grubs raw, and that might be okay. But insects carry diseases and to be on the safe side, it’s better to cook them.

eating insects like this grasshopper while out on a survival stay can really make you feel great. It is amazing how a chewing little food can change your perspective.
This grasshopper, roasted on a grass stem over a tiny fire was incredibly good.

Another thing about eating bugs is that you can’t always find lots of them at once. And the few you find at a time don’t really make a meal. Although I’ve been in situations where a single roasted grasshopper felt like a full meal.

Anyway, regardless of what I’ve read on other people’s websites about how you can “find hordes of grasshoppers or piles of grubs”, I usually find them one-by-one. So, they usually get added to a soup or stew. Sometimes I’ll roast them and eat them alone or power them into a tea for a little extra nutrition.

Regardless of the need to cook insects and the fact that it’s not always possible to find lots of them at once, bugs are GREAT when you’re out on a survival stay.

Great Things about Using Insects for Food

First of all, you don’t need a license to kill and eat them. This seems silly but on a lot of the survival stays I do, I can’t take mammals, fish or birds. I’d love to eat rabbit, raccoon, deer, bass or grouse. But if they aren’t in season or I don’t have a license, I can’t harvest them. That’s not the case with bugs. You can legally harvest and eat as many as you please. That’s a enough of a reason to learn how to gather and prepare insects.

Another advantage to eating insects is that you don’t need special equipment to gather them. No traps. No snares. No knife to build a deadfall. No tools to make a bow and arrows. No fish hooks. No nets. None of that. As long as you can walk, you can harvest insects. Sometimes this fact alone makes it incredibly practical to eat insects on your survival stays!

These grubs are a great to roast over the fire or add to stews in a survival situation.
I like the taste of grubs found in trees better than grubs gathered in the soil. All are delicious though.

Also, insects are incredibly nutritious. They typically have a high fat and protein content. Fat can be especially hard to get in a survival situation. Insects supply a lot of fats, especially grubs and other larvae. In fact, black soldier fly larvae are 35% fat (and 42% protein)! That’s a lifesaver if you’re in a dire situation.

Here are the articles I have done on eating insects. Not all of these are in a survival situation, since it’s kinda fun to make them at home too.

Eating black soldier flies


Here are some more articles I want to write for you. I just need to wait for the right season to get pictures and video before writing them up for you:

Cooking grasshoppers in a survival situation
Gathering and eating insects around lakes, streams and rivers
Gathering and preparing grubs in a survival situation
Catching and eating cockroaches
Back to the main food page with everything you need to eat well in a survival situation

Here are my Wilderness Survival articles.