
Learn how to make a birch bark basket with my newest tutorial or buy my book for more detail PLUS directions for making TWO different birch bark baskets including one quite similar to Native American style baskets!
How to Make a Birch Bark Basket
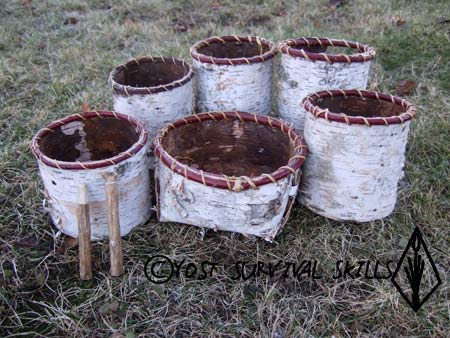
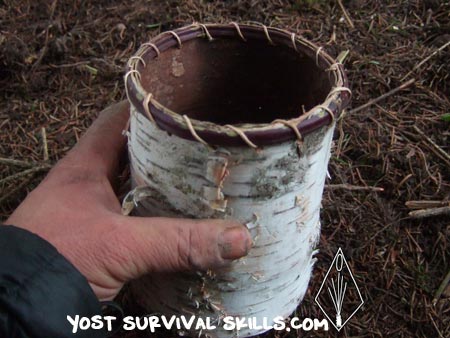
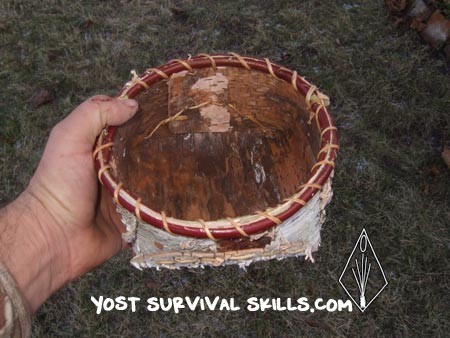
If you would like detailed instructions on how to make both of the birch bark baskets in the picture above, you can buy my book on Amazon called How to Make Birch Bark Baskets.
I learned about birch bark basket making when I was in my early 20’s. It was one of the first wilderness survival skills I mastered. Growing up in Wisconsin we had plenty of bark and with the help of Danny August, I started out making beautiful birch baskets.
After making hundreds of birchbark baskets, I am still amazed every time a basket materializes in my hands. You start with a dead tree that might otherwise rot away in the woods, some roots and a small sapling. And in a couple of hours you turn the raw materials into a beautiful, useful container that will last a lifetime. It is just so amazingly wonderful.
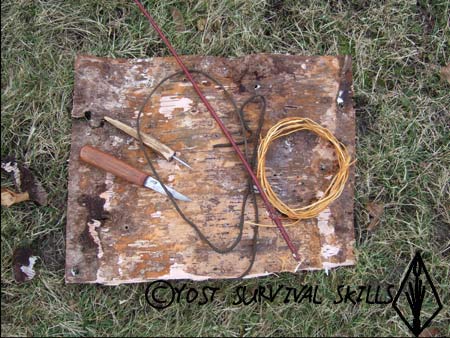
One of the great things about learning how to make a birch bark basket is that you don’t need many tools to make one. In fact, you can make the whole basket with just a knife. Or, if you want to make things easier, you can use your knife to make a wooden awl and a couple of clothespins. But, more on that in just a bit.
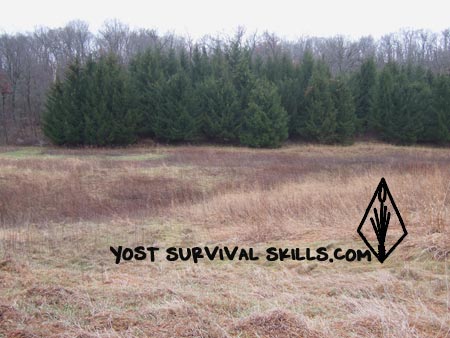
You can make your basket anywhere. But I suggest making your basket in the woods where you gather your materials. The energy from the forest as you make your basket gets into the soul of the basket and give it more meaning. When you look at your basket in years to come, you will remember sitting in the woods that day.
There is another nice thing about making your birch bark basket in the woods. As you sit quietly in the woods sewing your basket, the forest animals go back to their normal routine and you’ll see animals you might not get the opportunity to see otherwise. I have had deer, mink, squirrels, and a fox wander by as I made birch bark baskets.
How to Make a Birch Bark Basket
I’ve broken my explanation of how to make a birch bark basket down so it’s easy for you to follow along. There are also a couple of quick tools you can make that will help you out. It’s best to make things as easy as possible when first learning how to make baskets and the extra tool will help. Directions for making the tools are here too.
Tools Used to Make a Birch Bark Basket
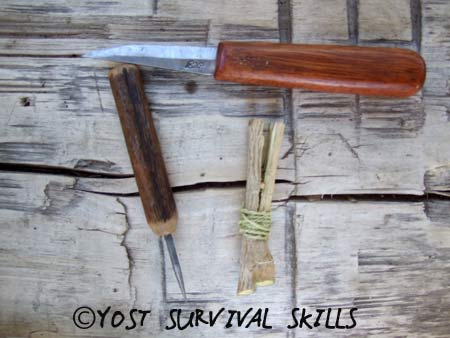
Like I said before, the only tool you really need is a knife. A wood, bone or metal awl is nice for poking holes in the bark where your stitches will go. A couple of make-shift clothespins are useful too.
To make a clothespin, find a small stick with a knot in it. Split the stick on the end without the knot. You can insert a tiny stick in the split to hold the pin open if you want. The knot will help keep the stick from splitting all the way, but if you want to be sure, you can wrap cordage just below the knot.
Gathering Materials to Make a Birch Bark Basket
You only need three things when making birch bark baskets: birch bark, sewing material, and a sapling for the rim. Find the best basket making materials you can.
How to Harvest Birch Bark
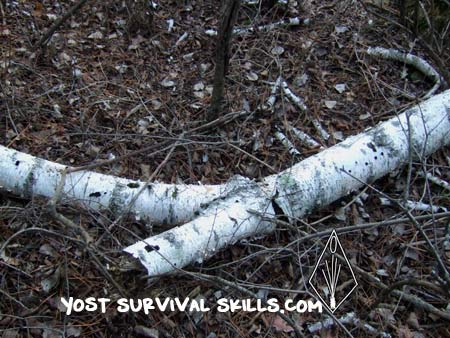
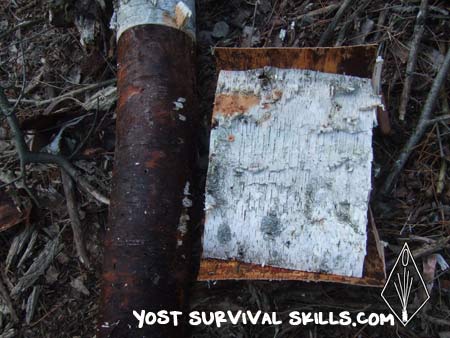
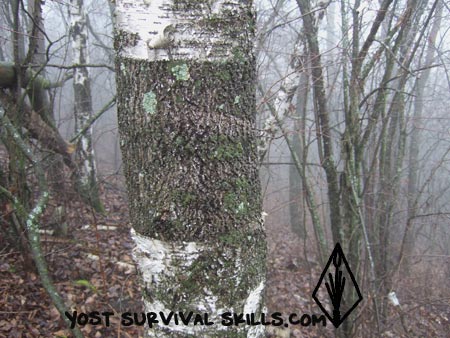
I almost always use white birch bark from dead trees. The bark from fallen trees is easier to work with, but you can use the bark from dead standing trees too. When you’re first learning how to make a birch bark basket, I would strongly suggest you use bark from dead trees.
First of all, bark from dead trees is available any time of the year. Second, you don’t scar a living tree and open it up to possible disease. And third, dead birch bark often has more character than bark from a living tree. There are often holes from woodpeckers, claw marks from squirrels and lichen on bark from dead trees.
Bark from living trees is more pliable so it’s usually easier to work with. The inner bark from live trees is smoother so it looks cleaner. But, if you want to get bark from living trees, you have to plan ahead.
There is a short time in late spring and early summer when the bark will come off a tree. If you try to get the bark off a tree at any other time, the bark simply won’t come off. It will stick to the tree like superglue and you have needlessly cut into a living tree for no reason.
But let’s say you planned ahead and it’s early summer and you want to collect bark. There is another huge consideration. You have to collect your birch bark in a certain way or you will kill the tree.
How to harvest birch bark
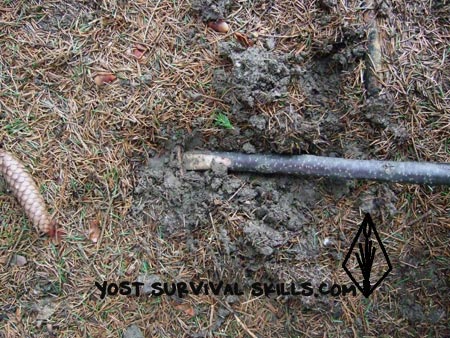
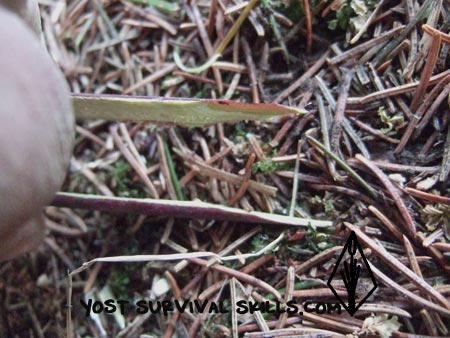
You only make ONE cut when harvesting birch tree bark from a live tree. You make that ONE cut going down the tree. You stick your knife in the tree and pull the knife straight down the tree. Then you put your knife away. You won’t need it anymore.(There are pictures of this technique below using bark from a dead tree since the process is exactly the same as doing it on a live tree.)
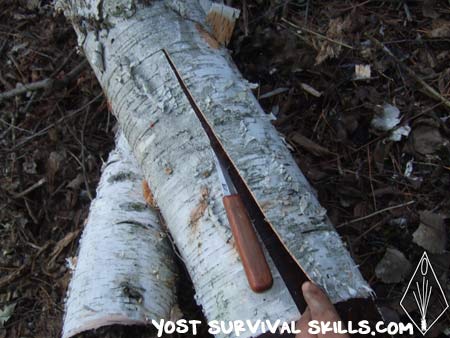
Then you peel the bark off around the tree at the top and bottom of your cut until the bark pops off. Peel the bark off half way around the tree and then start at your cut and peel the other way.
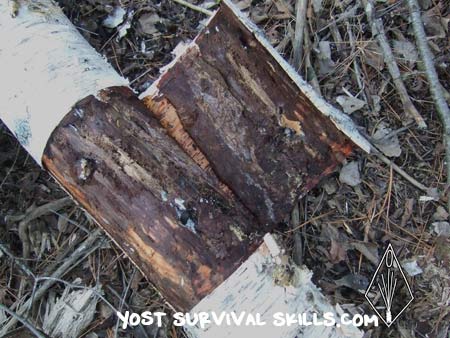
When you collect your birch bark this way, the tree should live. The tree will turn black where you cut the bark off, but the tree should survive. However, taking the bark from a live tree weakens the tree and makes it more likely to get a disease. So, if the tree is under stress from drought or whatever, don’t collect the bark from it. You could kill it. You are better off finding bark from dead trees.
Once again…
DO NOT CUT AROUND THE TREE IN A CIRCLE.
YOU WILL KILL THE TREE IF YOU DO THAT.
MAKE ONE CUT GOING DOWN THE TREE AND PUT YOUR KNIFE AWAY!
Collecting Materials for Sewing Your Birch Bark Basket
Traditionally, roots from spruce trees were used for sewing birch bark baskets and I think baskets sewn with spruce roots are the most beautiful baskets. However, you can’t always find spruce trees, so I’ll give you a couple of good alternatives.
Roots from any conifer tree are good. Red pine and fir are great choices, but really any pine, spruce or fir roots will do. I use roots from hardwood trees only when I can’t find anything else. Hardwood roots often break easily and now I use primitive cordage instead of hardwood roots.
In the winter you might not be able to dig into frozen ground for roots. In that case you can usually find milkweed or nettles to make cordage from. Dogbane is also a good choice, but it doesn’t usually grow where birch trees grow. The advantage of using cordage is that it won’t break on you. Being able to pull your stitches tight without worrying about breaking them makes things easier when making birch bark baskets.
As I type this, I am home in Wisconsin for Christmas with my family. We are having record-breaking high temperatures and even though it’s mid-December, the ground isn’t frozen. So, I’m going to show you how to dig conifer roots for sewing your basket.
The most important thing when you’re collecting conifer roots for sewing your birch basket is not to start your search too far from the tree. The roots you want will be about three or four feet from the base of the tree.
The roots will be close to the surface too. Start by digging down with your finger and plowing along until you find a root. Then follow the root in both directions until you have as much as you can get. Be very careful not to tear up any roots that cross the root you’re after. Remember, you want to do as little damage to the tree as possible.
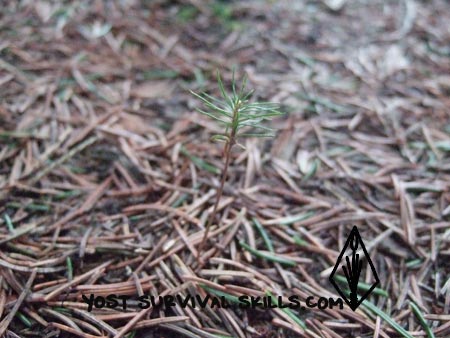
Finding a Rim for Your Basket
You have a lot of options for the rim of your basket. All you need is a small sapling or split stick that will bend in a circle. That said, it’s nice if you can find a rim material that adds color to your basket.
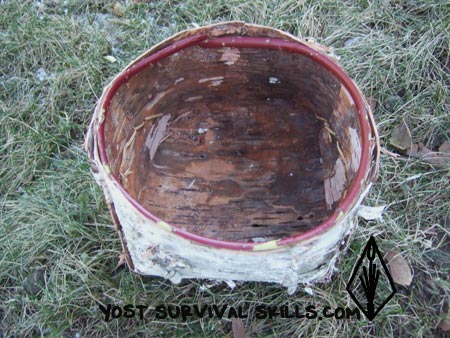
I really like using something red. Red osier dogwood, raspberry and multiflora rose all make beautiful, contrasting rims. Hazelnut makes rims with interesting texture. Split ash bends well and makes a strong rim. Really, any plant that you can bend around your basket without breaking will work. (Pictures of baskets in this article are made of dogwood and multiflora rose.)
Processing Materials for Making a Birch Bark Basket
The bark
When you are first learning how to make a birch bark basket, it’s best if you can use the bark you collect right away. If you let bark from live trees dry out, it will roll up and become useless. Dry bark from dead trees is much easier to work with and is actually about the same as when you take it off the tree.
The roots
The first thing to do with the roots is to scrape the bark off of them. I use the back of my knife and my thumbnail to remove the bark.
Split the roots down the center so they are easier to work with. To split the roots, start by making a cut in the center of the root with your knife. Then pull evenly on each half of the root to keep the two halves the same size.
You can wind up your roots and store them until you need them. Just be sure to soak the roots for an hour or so before using them.
The rim
I always make my rims from fresh-cut saplings because they are so easy to work with, but they shrink a little bit. You can cut your rim material ahead of time, let it dry out, and then soak it before you use it. Give your rim material about 12 hours to soak.
You need to split your sapling to make an inner and outer rim. You do this by making a cut with your knife in the center of the fatter end. Then carefully pull evenly on both sides of the rim so the split stays even.
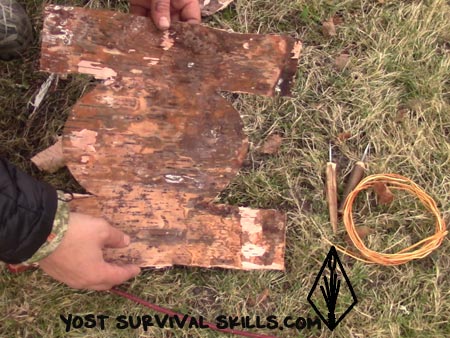
How to make a birch bark basket pattern
Study the picture below to see the basic pattern for a basket. The most important thing when first learning how to make a birch bark basket is to make sure that the tabs that stick out beyond the half circle reach to at least the center of the half circle when folded in.
Sewing Your Birch Bark Basket
How to Make a Basket
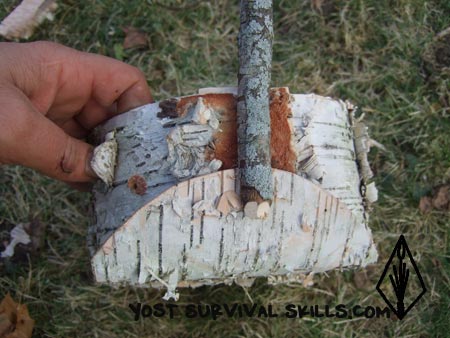
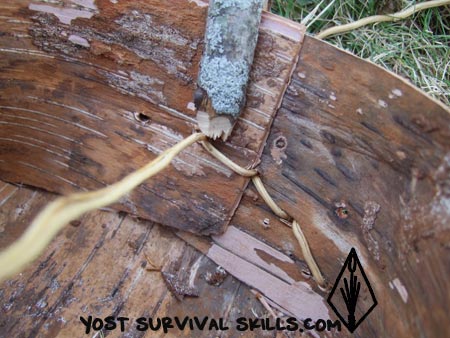
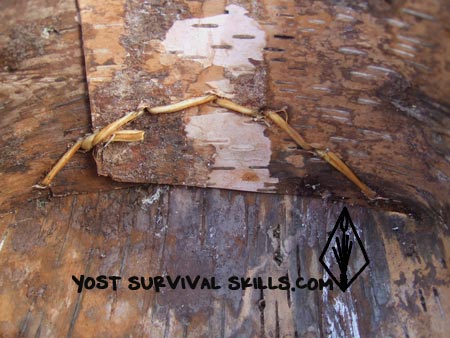
Once your birch bark basket pattern is cut out, fold the basket into its final shape and use the clothespins you made to hold it together. Poke holes in a half circle where you want to sew the basket together.
Then take a piece of root and pull half of it through the first hole. Next sew each end of the root through each hole, which means that you will be putting both ends of the root through the same hole. The second root to go through will be harder to get in, so use your awl to make the hole bigger. When you get to the last hole, simply tuck the ends in to make the last stitch on the inside.
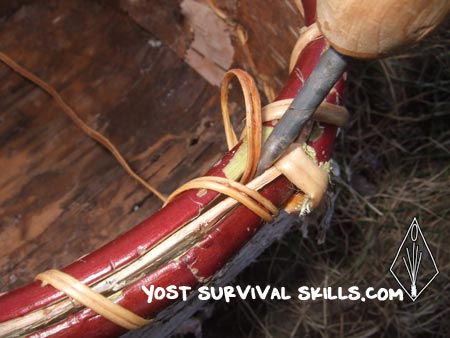
How to Make a Rim for Your Birch Bark Basket
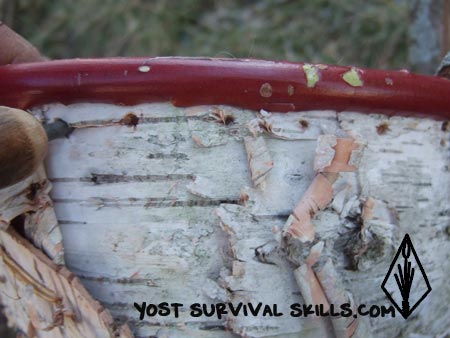
The most important thing about your two rim pieces (inner and outer) is to taper both ends so they match up and don’t create a bulge in the basket.
Start by putting the inner rim on the basket since you don’t need any pins to hold it. Cut the inside of the inner rim at an angle to get a taper on that end. Then wrap the rim around the inside of the basket until the two ends meet. Make a mark on the inside of the inner rim where they meet. Next taper the cut to your mark by starting your cut about an inch beyond the mark.
Taper the first end of the outer rim the same way you did with the inner rim. Now you can put the outer rim in place. This is a little bit trickier because the rim wants to pop off. Pin the outer rim down at the tapered end and wrap the rim around the basket. It’s really important to keep it tight against the side of the basket. Make your mark where the two ends meet and then cut the extra off with a taper. To be on the safe side, you might want to cut the rim a little long. Pin this end down with a second pin. It will stick out a little bit, that’s fine.

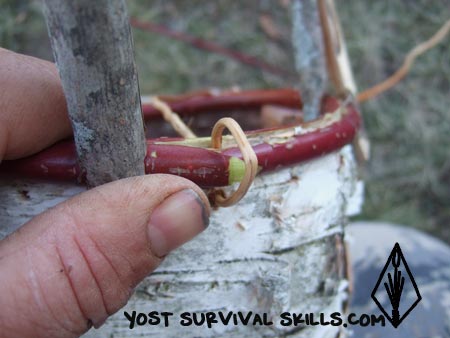
Now that the rim is pinned in place, you need to poke holes for sewing it on. Make your first hole right below the end of your outer rim. (You are going to start sewing there too because the stitches will hold the rim down and you can take out that pin out.) Go around the basket putting holes in right below the rim every 1/2 to 1 inch.
Now you are ready to sew the rim on. Find a piece of root that goes around your basket 3 times. Three times around is extra if your holes are an inch apart but about right if your holes are only 1/2 inch apart. Start by feeding the small end through the hole under the end of the outer rim. Pull it almost all the way through until there is a short, maybe 3 inch long, tag end. Stick that tag end between the bark and the inner rim.
Next you just sew around your birch basket until you get to that first hole. Go through the first hole a second time with the other end of the root. Take the extra root and stick it between the inner rim and the bark.
Cut off the extra tag ends and you’re done!
Congrats!!! You now have a basket that will be cherished forever whether you keep it or give it as a gift. A birch bark basket really is a thing of beauty… the bark, the design, the evidence of animals on the bark… they all come together to create an amazing work of art.
And now that you know how to make a birch bark basket, you can either make more of these or learn how to make another kind of basket.
Hi Ann,
I don’t put anything on my birch bark baskets. Once I’ve made my birch baskets, they are done. I have no idea what to do about a website not wanting to list your crafts. It might make sense to ask them what other vendors do. Or list on a different website where people have a deeper understanding of the rustic crafts you make.
I’m wondering if you ever “preserve” the baskets with shellac or some substance like that, or use some kind of treatment to kill pests. While I sell a lot of my craft items, the stores won’t add my birch and other rustic wood items to their website because of laws about crossing state lines.