So this is how my world works… and how I end up in places I never could have imagined.
Last spring, April 17th to be exact, it snowed about 6 inches in Wisconsin. I hate snow. In fact I hate winter period.
I was spending my first winter back home in Wisconsin after 12 years of being gone. And, I wasn’t terribly pleased to be getting snowed on in April!
We have a saying there, you might have the same saying in your home state. It goes, “April Showers bring May flowers.”
So, it’s not supposed to bloody snow in April!!! If anything, it’s supposed to rain.
That afternoon I called around and found out there was a paragliding competition in Florida. Warm, sunny Florida!
The very next morning, I packed up my CRV and drove to Florida to fly my glider for a couple of weeks!
Well, Mother Nature was messing with me no matter where I was. And it turned out that we had crappy weather all week. Which meant we only got to fly 2 of the 6 days.
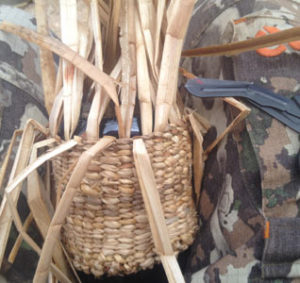
The other 4 days everyone just kind of hung around at camp and talked. Well, I’m not very good at being idle and sitting around. So I started on some crafts from plants I found around camp… baskets, brooms, cattail dolls, and other little crafty things.
I ended up teaching a handful of people how to make cattail dolls and baskets. The week turned out to be very flattering impromptu classes on crafts and making bow drill fires. I say flattering because people were really interested in these skills and appreciated making their own things.
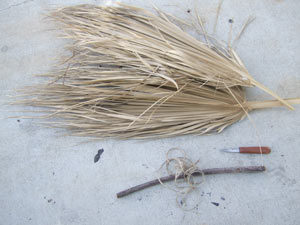
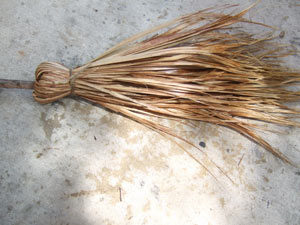
The brooms were a big hit, and I made a handful of them for other paraglider pilots. They loved them. So, I thought I’d write something up for you here, along with pictures, to show you how I made them.
And while I use fan palm fronds for the brush here, you can make your broom with tons of different materials. The process is pretty much the same.
I’ve used the lots of plants for the brush part of my brooms…. the ends of willow shoots leftover from making baskets, mustard plants, yucca, grass flower stalks, and cedar leaves.
All that’s required from the material you make the brush part of your broom out of is that it’s fairly resilient to bending and you have to be able to line it all up even at the bottom. Or be able to cut the material off evenly.
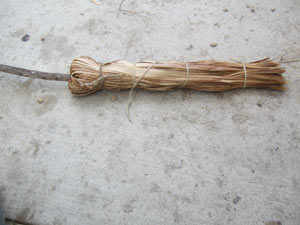
So get a few handfuls of the seedhead stalks from grass, willow, or if you want to cheat, use broom corn. These are what you’ll use to make the brush.
You’ll also need some cordage. In these pictures I just use some hemp string in had in the car.
The only other thing you need is a stout branch or something similar to make into a handle.
The only tool you need is a knife. And a scissors is nice if you have to cut the ends off evenly on the finished broom.
This is everything you need to make a broom. The brush can be made of anything that is semi-stiff.
Once you have everything you need, line up the material you’re going to use for the brush so it’s as even as you can get it.
Don’t cut anything yet, you will do that last.
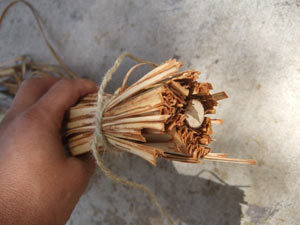
Line up the ends of your brush material with the end of your handle. And tie it all together TIGHTLY!
Now, position your brush material evenly around the handle so that the brush material covers the end of the handle.
At about 6 inches up from the bottom of the handle, tie the brush material as tightly as you can to the handle. The brush stuff is going to want to spin and become uneven as you tie it on. Just do your best to keep it even.
Tie the bristles around the handle a second time. Again, TIGHT!
Tie the brush material to the handle in a second spot close to the end of the handle.
Fold the brush material over itself and hold it there while you tie it.
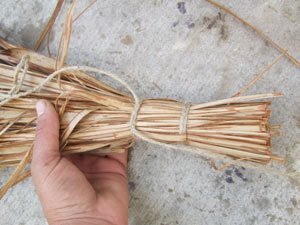
So now the bottom of the handle should be buried in the bush material. Take the brush material and double it back over itself so it sticks out opposite the handle.
Tie the double layered bristles to the handle of your primitive broom.
Hold it there and tie the brush part down tightly. Make it so you catch the bottom of the handle with this knot.
Tie the brush material together below the handle. You might want to tie a third time farther down.
Next, go down a few inches and tie around the broom a second time with another really tight knot. If you have a lot of brush material sticking out beyond the handle, go down a few more inches and tie it again.
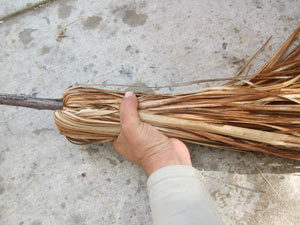
Here you see 2 temporary lashings that will be taken off once the ends are all evenly cut.
You’re going to lash the brush material together temporarily so you can cut it all off even. So go a few inches up from where you want the bottom of your brush to be and tie it all together. All this does in hold things together while you cut the ends off.
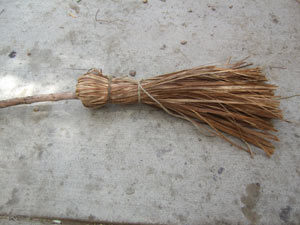
Cut off the ends, untie the last lashing, and your broom is done!
The finished broom!
These are great brooms to make and use. A lot of times, as the broom wears away, I’ll just cut the ends off until it’s just a stubby little broom.
They are great for sweeping out your tent or tarp, brushing the crap off your sleeping pad and bag, and cleaning under your sleeping pad before you lay it down. I also use mine to brush the snow off my boots before going in the cabin.
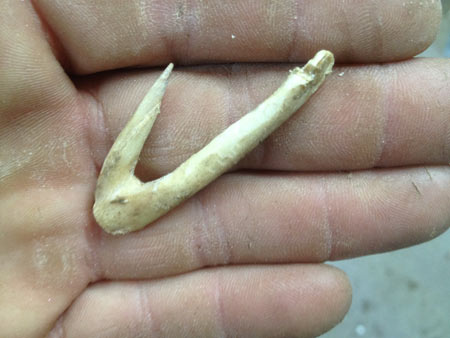
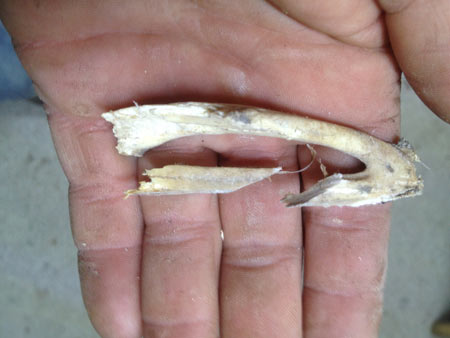
How to Make a Primitive Fish Hook from Deer Nasal Bone
A bone fishing hook made from the upper jaw of a deer skull. These can be made in about 20 minutes once you know how to make a primitive fish hook from deer bone!
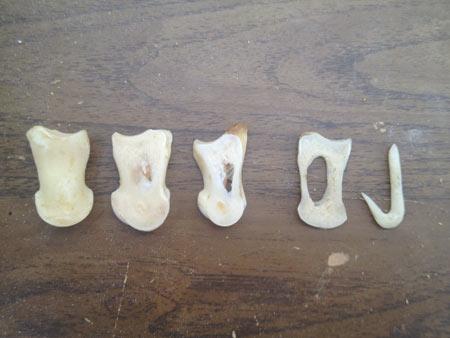
I’ve had a few requests from people who want to know how to make a primitive fish hook from bone. I have seen them made out of deer toe bones (phalanges), but that style takes a lot of work. The way I show you here, making them out of a deer nasal bone, is much easier since the bone doesn’t need much work to get it the right shape. Here is another article on making these.
This image of David Wescott’s hooks shows the progression of making hooks from deer toe bones. It’s a lot of work compared to the hook I show you here.
Step One in Making a Fish Hook from Deer Bone
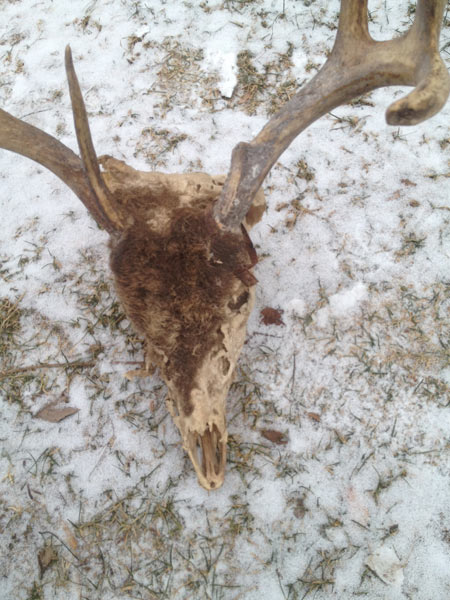
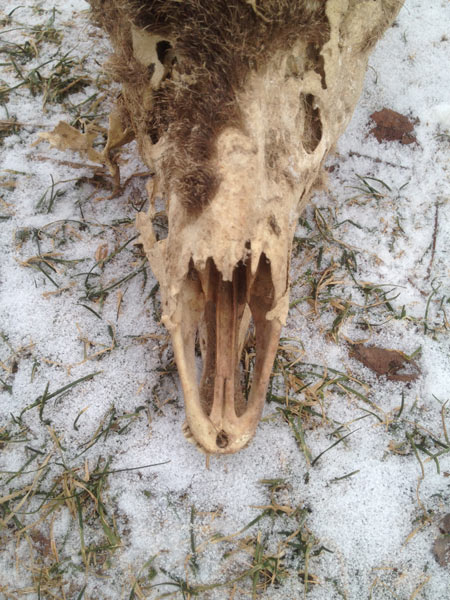
Often the hardest thing to do when you’re ready to make a fishing hook from deer bone is finding a deer head. Here in Wisconsin there are a lot of roadkill deer and I remember where they are so I can come back a few months later after the scavengers have picked the head clean. You can also get heads during hunting season from butchers or hunters.
The part of the head that you want is the end of the upper jaw. Since it’s kind of confusing where the bone you want is, the pictures here zoom in on the correct bone, which is actually the maxilla.
This deer head from a roadkill has been eaten away enough that the nasal bone is exposed.A closer look at the end of the upper jaw… the part you want for your fish hook.
Step Two in Making a Primitive Fish Hook from Deer Bone
You need to remove about 3″-4″ (7.5-10cm) of the end of the upper jaw for your hook. I used a hatchet to carefully chop this bone off, but if you do it with blunt force like I did here, be careful! This maxilla bone is fragile and can shatter easily. It’s much safer to saw the bone off the skull. Or, you can notch the bone and snap it off at your notches.
I carefully chopped the end of the upper jaw bone off with a hatchet, but it’s better to use a saw to get the bone off the rest of the skull.The end of the maxilla fish hook after a bit of cleaning. Note that since I hit this with the hatchet, I only have one good side left.
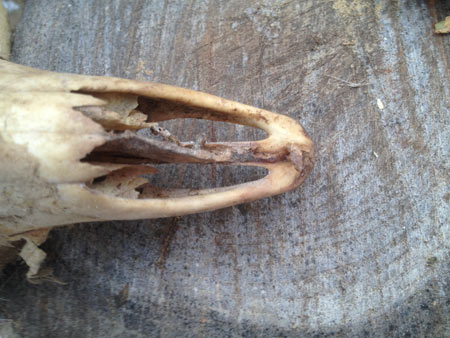
Step Three in How to Make a Fish Hook from Deer Bone
Now that you have the tip of the upper jaw bone off the head, decide which side of the bone has the best hook in it. The two sides are often symmetrical, but if you smacked it with something, you might only have one good side left!
Cut through the center of the little bone in the middle so that you save your good side.
When making a fish hook from a deer jaw bone, cut off the bad side of the hook.
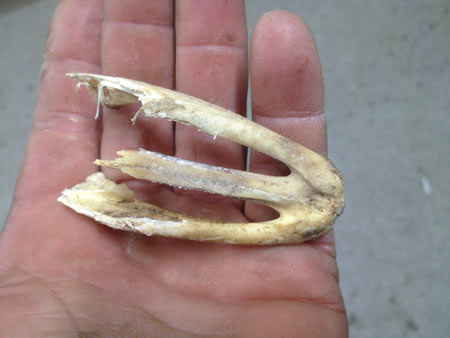
Step Four in How to Make a Primitive Fish Hook from Deer Bone
Cut the middle bone off at an angle. Make sure you leave enough bone to shape a hook out of. I cut the one in the picture off too short and had to start over with a whole new deer head to show you a good finished hook!
Cut the part of the bone off to get a good shape to your hook. I cut this one off too short and had to start over to finish this tutorial.
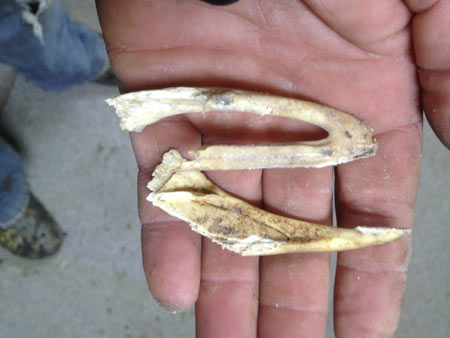
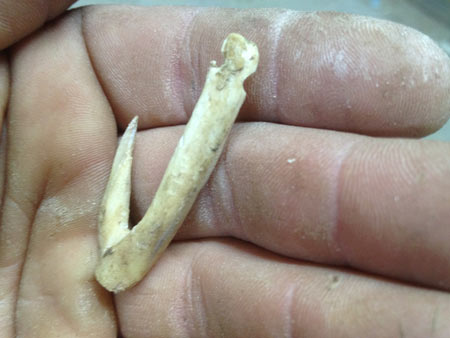
Step Five in How to Make a Fish Hook from Deer Bone
Shape, thin and sharpen the hook. Bone isn’t nearly as strong as steel, so your finished hook is going to be bulky compared to store-bought hooks.
I put little notches in the hook’s shank to hold the string. And I’m not sure if it really matters, but I tie the string on so the knot is exactly in line with the hook. My thought here is that when I pull the line, the hook will pivot at the tie-point and catch better, but I really don’t know if this is true or not. I do hook a lot of fish though.
A finished fish hook from a deer bone. I make my shanks thick so they are stronger.
Thickness is a tradeoff between strength and wanting a small hook the fish doesn’t feel. In my experience, it’s better to error on the side of bigger and stronger. It’s awful losing a fish because your hook snaps! I often fish using offal from mammals that I’ve trapped, and I bury the hook in a mass of meat. Fish like catfish will suck the whole thing in with no problem. Panfish baited with worms are a different story though, they steal my bait almost every time!
I’ve tried to put a barb in these hooks but the hooks have broken off below the barb where they’re thin, so I no longer put a barb on them. You just have to let the fish take the hook down to its stomach, or keep constant pressure on the line when bringing the fish in to land it.
Learning how to make a primitive fish hook from deer bone like this is really easy and if you have an extra deer head laying around, making a fishhook from bone is a fun little project!
I love getting comments, so if you have questions or have ideas, let me know in the comments below.
It was a cool spring day in the Rockies. I was making a fish trap out of willows to feed myself for the next few days as I camped along a nameless tributary.
As I sat weaving, the chickadees that kept me company as I wove my trap gave their alarm call indicating a predator on the ground moving toward us.
A bear I figured. Crap. I’d seen plenty of bears on this trip and they weren’t interested in me at all. But, there was no reason to push my luck.
I moved away from the stream and hid, figuring I’d let the bear pass and finish my trap.
Silently, appearing out of nowhere wasn’t a bear, but an old woman. She was barefoot, wearing a deerskin cloak over tattered jeans and a worn white blouse.
She squatted down out of my sight to investigate the area where I had been making my trap. When she stood up again, she was looking directly at me.
I had no idea how she knew exactly where I was hiding in the thicket, she never even looked around.
I walked down and introduced myself to Starlight Laughter, one of the most interesting people I’ve met in my travels.
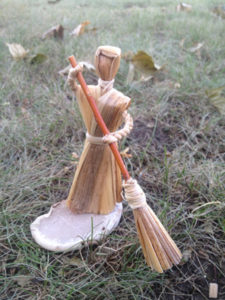
We spent that day and the next together feeding butterflies (I’m not kidding, she showed me how to feed butterflies out of your hand), making baskets, collecting wild edible plants, and she taught me how to make cattail dolls.
There is spirit in these cattail dolls she told me, and they need to be made with love. The first one you make should always be given away and you should think about and feel whoever you’re making it for. She told me the love would transfer through the doll to its recipient.
This cat tail doll is mounted on a bracket fungus.
I gave my first cattail figurine to the place we met. It held onto an alder branch along the bank, sharing the joy I had in meeting Starlight Laughter.
That was my introduction to making the cattail doll you see here. I have changed them a bit over time to make it easier for beginners and more human-like, but this is essentially the same cattail doll I learned to make that day years ago.
I hope you love making these cat tail dolls and the people you share them with enjoy them as well.
I have a book on Amazon on how to make cattail dolls that goes into more detail, but this will post here will get you started!
The best time of year to harvest cattail is in the fall right when the leaves go from green to brown. But, this isn’t a hard and fast rule. It’s possible to make cat tail figurines from the leaves of older plants as long as they haven’t rotted too much. And you can harvest the green leaves in late summer through fall and just let them dry.
There are 3 different kinds of leaves on each cattail plant.
Making the Head of Your Cattail Doll
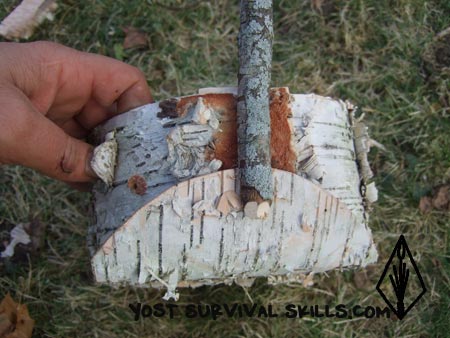
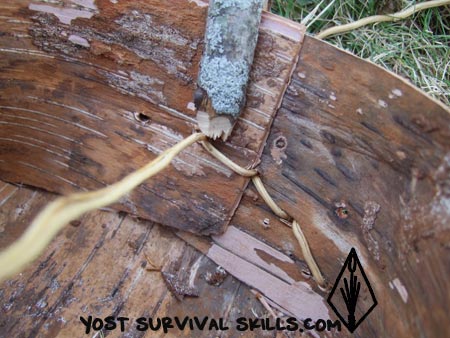
To make the head of your cat tail doll, start with by putting a rock in the middle of the widest leaf you have. Then wrap around the rock with other leaves until the rock is buried.
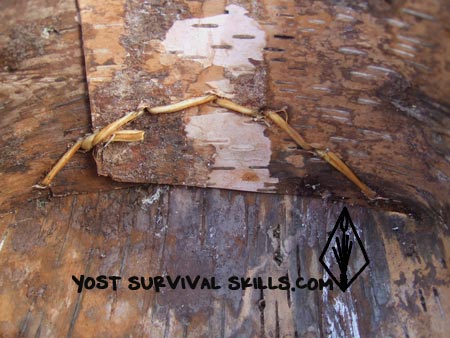
Tie off the doll right below the head using a waist knot. That will form the head and body core of your doll.
How to Make Arms for Your Cattail Doll
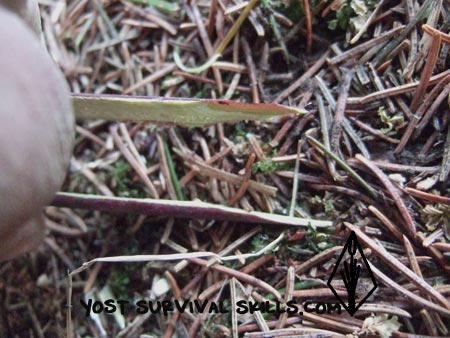
Next you’ll need to make the doll’s arms. You do this by twisting supple cattail leaves toward the center of the fibers. The twist you use here is the same way you’d make string from nettles, dogbane, milkweed or other fibrous plant.
Once your arms are done, slide them up your cattail doll and place leaves over the shoulders of your doll until the figurine has enough girth.
Cut the bottoms of your cattails off so they are about 7 times the length of the doll’s head.
Then you will tie another waist knot about half way down your doll to make the waist.
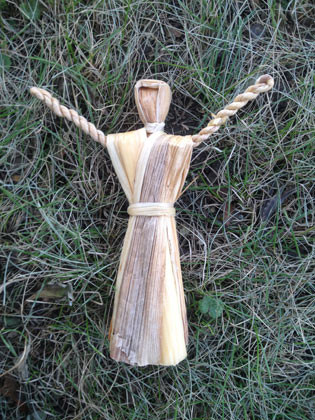
This is the basic doll and what you will end up with after learning how to make cattail dolls.
Your basic cattail doll is done at this point, and this is where the fun really begins…
Personalizing The Cattail Dolls You Make
Your cattail doll has perfect hands for holding things and you can make lots of cool stuff for your doll to make it perfect for you… or for a gift.
Here are some things I like to add;
Brooms
Any straight twig or branch will do for the handle. To make the broom, fold a few leaves in half and shove the stick through the middle of the leaves. Lash the leaves to the stick with a waist knot. Use the tip of a knife to make bristles on the broom.
Sword, Spears, Axes, and Knives.
Whittle these out of wood.
Bows
Start with a twig and shape it into a bow. You can give your bow a lot of detail by carving an arrow rest on the bow. Make a nock at one end of the bow to hold the string and tie the string to the other end of the bow.
Arrows
The very end of male cattail stalk, above the seeds where the pollen used to be makes great arrows. You can split the stalk and slide a tiny piece of birch bark into the split for fletching. You can hold the fletching on by wrapping thread or sinew above the fletching.
Willow twigs are also great for arrows.
This cattail doll is modeled after a doll by Mors Kochanski.
Quiver
Any pithy plant works well for your quiver. Cow parsnip, multiflora rose, and raspberry are my favorites. For arrows in the quiver you can make short arrows and stick them into the pith.
Grappling Rope
Use cattail, nettle, milkweed, dogbane or other good fiber plant to make a long rope out of. You can also make small pieces of cordage for the strap on quivers or to hold swords and knives on your cattail doll.
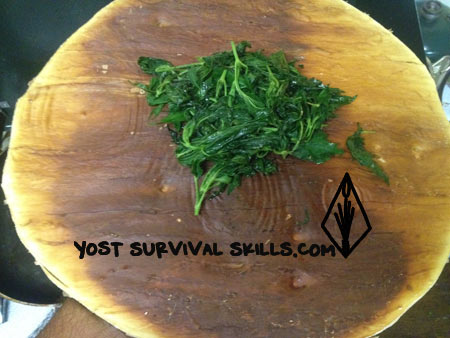
Cooked nettles on a green ash plate. Nettles cook down to about half their volume.
I love eating nettles early in the spring as they pop up from the cool ground, sometimes when there is still frost in the mornings. Nettles are one of the most nutritious edible weeds you can find.
Nettles are easy to identify and common throughout the US. Nettles can be dried and used later in soups, to make tea, or as a vegetable dish. This is an edible wild plant well worth knowing how to harvest, store and cook.
How to Identify Stinging Nettles
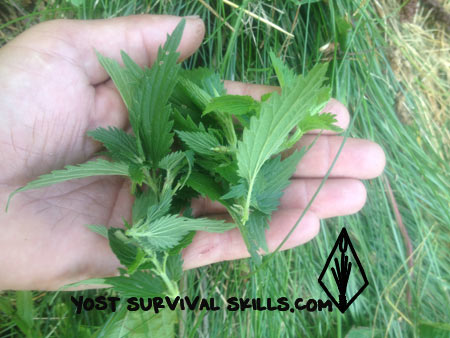
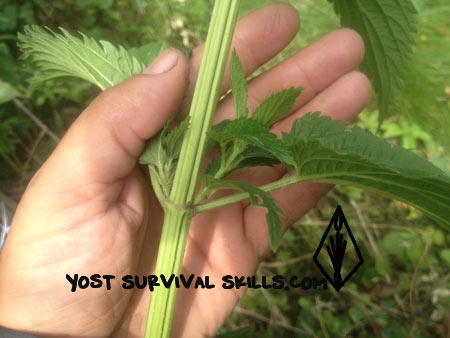
Nettle plants are great to eat, but you have to get past the hairs on the stalk and under the leaves.
Stinging nettle is pretty easy to identify. The plant has tiny hairs made of what is basically glass. These hairs penetrate your skin and break, releasing a burning acid. It sounds much worse than it is and for most people, the pain is gone in about 30 minutes.
Nettles usually grow in well-established patches of two to 10 square feet. The plants are usually about 4 to 8 feet tall.
They grow in moist, rich wooded areas and places where the soil has been disturbed. I usually find them along rivers and streams growing in the shade.
The plants have simple, serrated leaves that come off the plant opposite one another. The underside of the leaves have the same tiny, stinging hairs found on the stems.
Honestly, just take a look at the pictures on this page to see what they look like.
How to Collect Nettles Without Getting Stung
Picking stinging nettles by hand is often easier than wearing gloves if you have calluses.
A pair of thin gloves will protect your hands from getting stung by nettles. But, I prefer to harvest nettles without gloves and don’t get stung very often. I find gloves are a bother and too cumbersome to mess with.
If you have calluses on your hands, you can probably collect nettles barehanded as well. The key is to only let the plant touch the palms of your hand. Most people, myself included, have tender skin on their wrists and the backs of their hands and get stung there.
Eating Nettles
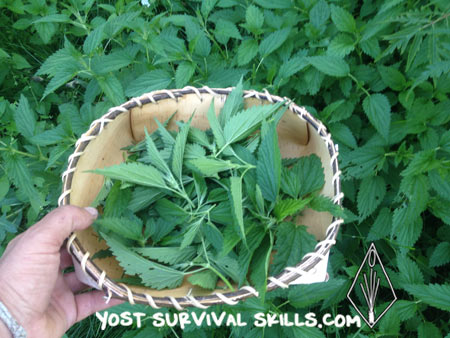
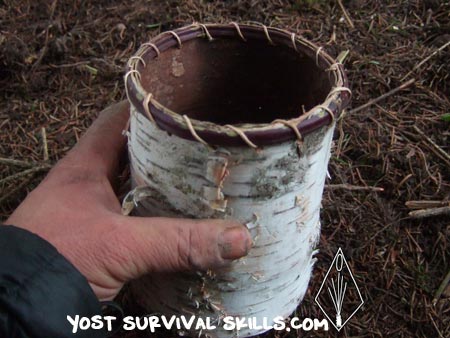
Harvesting stinging nettle tips in a birch bark basket
Nettles are delicious, nutritious and you can eat them all spring and into fall if you harvest them throughout the year.
In my various outdoor skills courses people often ask me if you can eat nettles. The answer is a resounding “Yes!” Nettles are one of my favorite wild edible plants. There are two edible parts of the stinging nettle plant, both require cooking. The beauty of that cooking process, no matter how you do it, is that it renders the plant totally harmless. The stinging qualities of the nettles disappear.
The first edible part of the plant is the young shoots. These are best when harvested when they are around 6″ tall, I typically collect the top three or four leaf pairs. These nettle shoots can be steamed or boiled for a few minutes and eaten with a little butter and salt, or plain like I do.
The second edible part of stinging nettles is the tops of the plants throughout the season any time before the flower heads develop. If it’s later in the growing season, I usually only take the top two or three pairs of leaves. Sometimes I get the top four pairs but the lower leaves can be a bit stringy.
The key to having nettles to harvest during the summer and fall is to pick (and eat) the top 4 or 6 sets of leaves on the plants after 10-20 sets of leaves have grown on the plant. When you pick the tops of the nettle, the plant will send out new leaves at each spot along the stem where the leaves come out. These junctures of leaves are called “nodes.”
After a couple of weeks, you can harvest the fresh, new leaves the plant sends out at each node. And, you can continue to do this well into fall. It is mid-August as I write this, and I am still harvesting young nettle leaves from plants that sent new leaves out from the nodes.
Nettle plants send out new shoots at each leaf axis if you pick the top off the plant.
How to Prepare Stinging Nettles
Samuel Thayer has a great section on eating nettles you can see his site here.
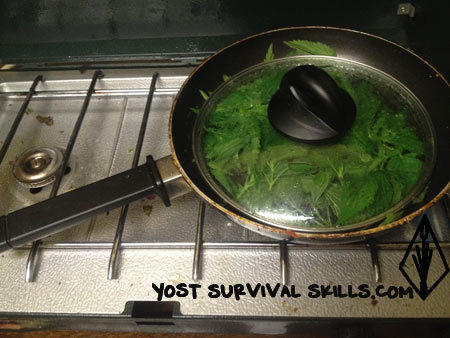
Steaming stinging nettles is a great way to cook them. I often fry them for a bit after I steam them.
You can cook nettles the same way you prepare spinach. Either steam or boil it. Nettles will cook down to half their olume, so use more than you think you’ll need. Once the plant is cooked (or dried), it can no longer sting you.
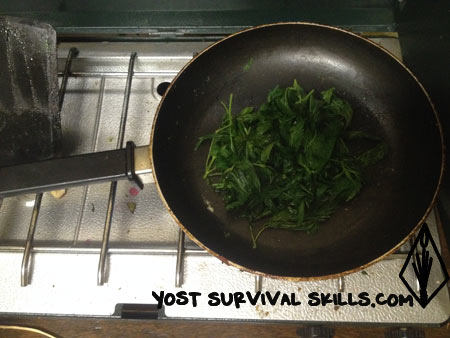
My favorite way to make nettles is to put a little water in a pan and steam the leaves for a few minutes with the pan covered. Then I take the cover off and let most of the water evaporate. Next, I add some olive oil and fry them for a few more minutes. Eaten with a little butter, they are delicious. Most people who say they don’t like edible wild plants love nettles prepared this way.
I think frying nettles after steaming them makes them even better.
I’ve also made great quiches substituting nettles for the spinach. Eating nettles in dishes you’d normally cook is a great idea. In fact, you can use nettles as a substitute for spinach in any recipe for a healthier dish.
Making Nettle Tea
There’s not much to making nettle tea. The key is actually in drying the leaves in preparation for making tea later. You want to dry the leaves spread out in the sun. At home I use screens, in the wilderness I put the nettles on dark rocks. Take the leaves out of the sun as soon as they crumble in your hand. Then store them for later use. I usually put them in Ziploc bags that are cracked open about an inch and this works great for me.
To make nettle tea all you do is boil nettles with water for a few minutes. It turns a rich, dark green in a few minutes. I always eat the leaves leftover from the tea whether I am using fresh or dried leaves. You will find that nettle leaves are almost as good after they’re dried as when they are fresh.
The dry leaves can also be powdered and added to just about any dish to add color, heartiness and nutrients. You can even make a broth by adding salt to the dried, boiled leaves.
Preparing and eating nettles is easy and fun. This is one plant you will want to add to your wild edible plant knowledge base.
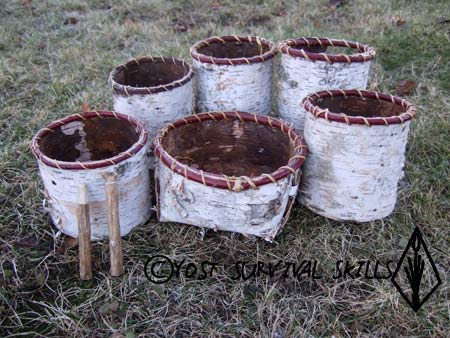
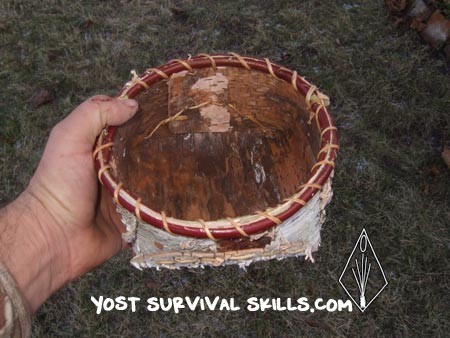
Learn how to make a birch bark basket with my newest tutorial or buy my book for more detail PLUS directions for making TWO different birch bark baskets including one quite similar to Native American style baskets!
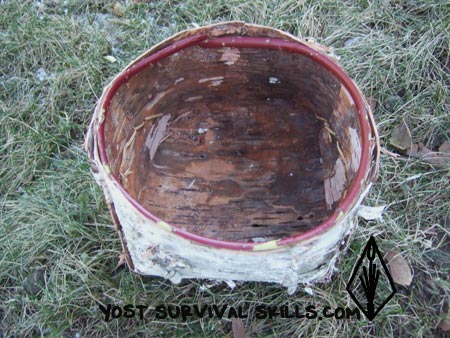
Over the years I’ve made hundreds of birch bark baskets. I made three new ones this year. Note the two different basket styles shown here.
How to Make a Birch Bark Basket
If you would like detailed instructions on how to make both of the birch bark baskets in the picture above, you can buy my book on Amazon called How to Make Birch Bark Baskets.
I learned about birch bark basket making when I was in my early 20’s. It was one of the first wilderness survival skills I mastered. Growing up in Wisconsin we had plenty of bark and with the help of Danny August, I started out making beautiful birch baskets.
After making hundreds of birchbark baskets, I am still amazed every time a basket materializes in my hands. You start with a dead tree that might otherwise rot away in the woods, some roots and a small sapling. And in a couple of hours you turn the raw materials into a beautiful, useful container that will last a lifetime. It is just so amazingly wonderful.
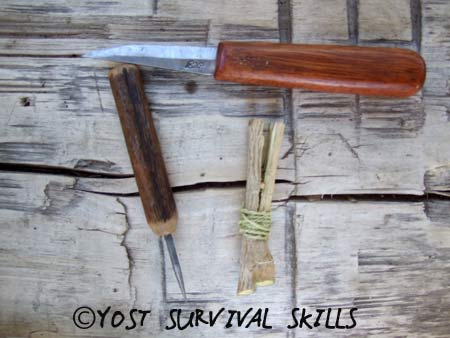
One of the great things about learning how to make a birch bark basket is that you don’t need many tools to make one. In fact, you can make the whole basket with just a knife. Or, if you want to make things easier, you can use your knife to make a wooden awl and a couple of clothespins. But, more on that in just a bit.
This is pretty much all you need to make a birch bark basket. The only thing missing from this picture is a couple of homemade clothespins.
You can make your basket anywhere. But I suggest making your basket in the woods where you gather your materials. The energy from the forest as you make your basket gets into the soul of the basket and give it more meaning. When you look at your basket in years to come, you will remember sitting in the woods that day.
There is another nice thing about making your birch bark basket in the woods. As you sit quietly in the woods sewing your basket, the forest animals go back to their normal routine and you’ll see animals you might not get the opportunity to see otherwise. I have had deer, mink, squirrels, and a fox wander by as I made birch bark baskets.
How to Make a Birch Bark Basket
I’ve broken my explanation of how to make a birch bark basket down so it’s easy for you to follow along. There are also a couple of quick tools you can make that will help you out. It’s best to make things as easy as possible when first learning how to make baskets and the extra tool will help. Directions for making the tools are here too.
Tools Used to Make a Birch Bark Basket
All you really need to make birch bark baskets is a knife. But an awl and a couple of homemade clothespins make it a lot easier.
Like I said before, the only tool you really need is a knife. A wood, bone or metal awl is nice for poking holes in the bark where your stitches will go. A couple of make-shift clothespins are useful too.
To make a clothespin, find a small stick with a knot in it. Split the stick on the end without the knot. You can insert a tiny stick in the split to hold the pin open if you want. The knot will help keep the stick from splitting all the way, but if you want to be sure, you can wrap cordage just below the knot.
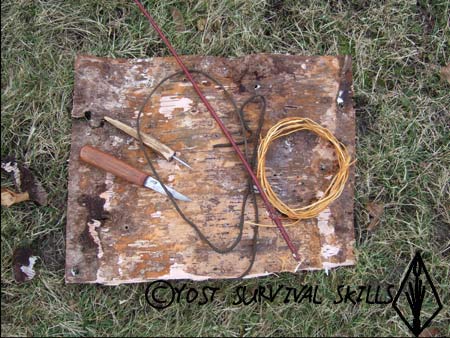
Gathering Materials to Make a Birch Bark Basket
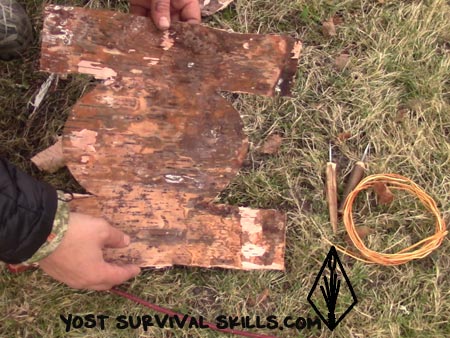
You only need three things when making birch bark baskets: birch bark, sewing material, and a sapling for the rim. Find the best basket making materials you can.
How to Harvest Birch Bark
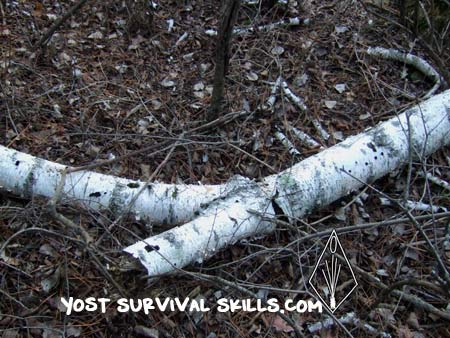
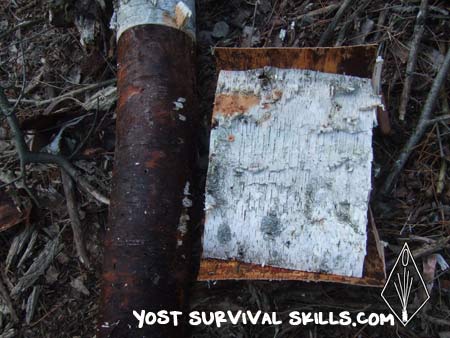
Learning what bark you should harvest is very important. This is perfect bark for making birch bark baskets. The tree is long dead and the wood is rotting out of it.
I almost always use white birch bark from dead trees. The bark from fallen trees is easier to work with, but you can use the bark from dead standing trees too. When you’re first learning how to make a birch bark basket, I would strongly suggest you use bark from dead trees.
First of all, bark from dead trees is available any time of the year. Second, you don’t scar a living tree and open it up to possible disease. And third, dead birch bark often has more character than bark from a living tree. There are often holes from woodpeckers, claw marks from squirrels and lichen on bark from dead trees.
Bark from living trees is more pliable so it’s usually easier to work with. The inner bark from live trees is smoother so it looks cleaner. But, if you want to get bark from living trees, you have to plan ahead.
There is a short time in late spring and early summer when the bark will come off a tree. If you try to get the bark off a tree at any other time, the bark simply won’t come off. It will stick to the tree like superglue and you have needlessly cut into a living tree for no reason.
But let’s say you planned ahead and it’s early summer and you want to collect bark. There is another huge consideration. You have to collect your birch bark in a certain way or you will kill the tree.
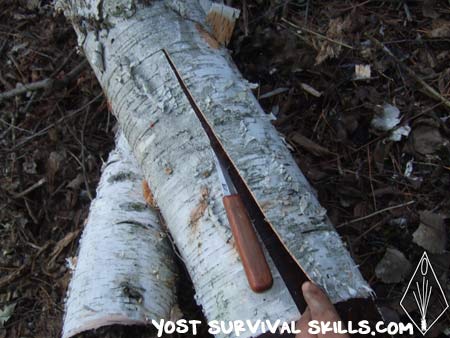
How to harvest birch bark
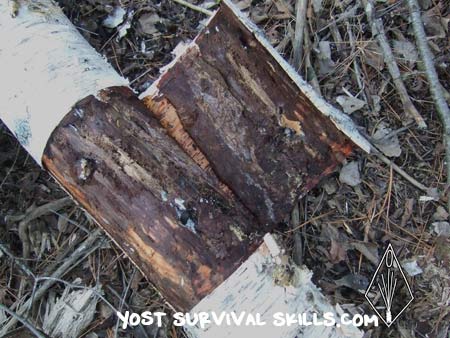
You only make ONE cut when harvesting birch tree bark from a live tree. You make that ONE cut going down the tree. You stick your knife in the tree and pull the knife straight down the tree. Then you put your knife away. You won’t need it anymore.(There are pictures of this technique below using bark from a dead tree since the process is exactly the same as doing it on a live tree.)
Learning how to harvest birch bark is the most important thing I want you to learn from this article. Whether the birch tree is dead or alive, you make only ONE cut in the tree like you see in the picture here.
Then you peel the bark off around the tree at the top and bottom of your cut until the bark pops off. Peel the bark off half way around the tree and then start at your cut and peel the other way.
After making your ONE cut in the tree, you PEEL the bark around the tree. Peel it half way from one side, then start at your cut and peel off the other side.These two bark slabs are taken from the same tree right next to each other. Take as much as you can from the same tree.
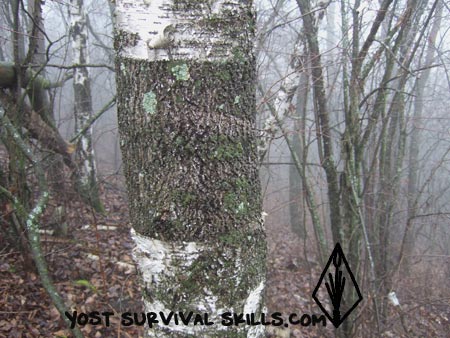
When you collect your birch bark this way, the tree should live. The tree will turn black where you cut the bark off, but the tree should survive. However, taking the bark from a live tree weakens the tree and makes it more likely to get a disease. So, if the tree is under stress from drought or whatever, don’t collect the bark from it. You could kill it. You are better off finding bark from dead trees.
The darker bark on this live birch tree shows the scar tissue left after someone removed a slab of bark. Removing bark from live trees opens them up to injury and disease.
Once again…
DO NOT CUT AROUND THE TREE IN A CIRCLE.
YOU WILL KILL THE TREE IF YOU DO THAT.
MAKE ONE CUT GOING DOWN THE TREE AND PUT YOUR KNIFE AWAY!
Collecting Materials for Sewing Your Birch Bark Basket
Spruce trees have the best roots for sewing birch bark baskets.
Traditionally, roots from spruce trees were used for sewing birch bark baskets and I think baskets sewn with spruce roots are the most beautiful baskets. However, you can’t always find spruce trees, so I’ll give you a couple of good alternatives.
Roots from any conifer tree are good. Red pine and fir are great choices, but really any pine, spruce or fir roots will do. I use roots from hardwood trees only when I can’t find anything else. Hardwood roots often break easily and now I use primitive cordage instead of hardwood roots.
In the winter you might not be able to dig into frozen ground for roots. In that case you can usually find milkweed or nettles to make cordage from. Dogbane is also a good choice, but it doesn’t usually grow where birch trees grow. The advantage of using cordage is that it won’t break on you. Being able to pull your stitches tight without worrying about breaking them makes things easier when making birch bark baskets.
As I type this, I am home in Wisconsin for Christmas with my family. We are having record-breaking high temperatures and even though it’s mid-December, the ground isn’t frozen. So, I’m going to show you how to dig conifer roots for sewing your basket.
The most important thing when you’re collecting conifer roots for sewing your birch basket is not to start your search too far from the tree. The roots you want will be about three or four feet from the base of the tree.
Spruce and other conifer roots for sewing your birch bark basket are close to the surface. There’s no need to dig deep.
The roots will be close to the surface too. Start by digging down with your finger and plowing along until you find a root. Then follow the root in both directions until you have as much as you can get. Be very careful not to tear up any roots that cross the root you’re after. Remember, you want to do as little damage to the tree as possible.
Be careful not to kill spruce seedlings or break other roots when digging your keepers.
Finding a Rim for Your Basket
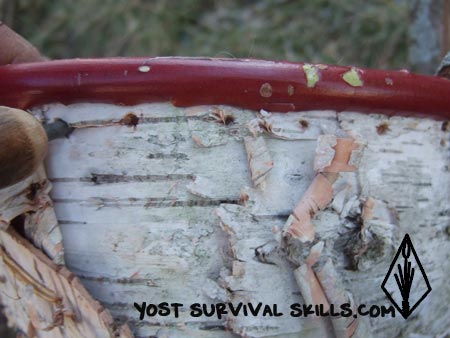
You have a lot of options for the rim of your basket. All you need is a small sapling or split stick that will bend in a circle. That said, it’s nice if you can find a rim material that adds color to your basket.
This multiflora rose rim adds color and contrast to my birch bark basket.
I really like using something red. Red osier dogwood, raspberry and multiflora rose all make beautiful, contrasting rims. Hazelnut makes rims with interesting texture. Split ash bends well and makes a strong rim. Really, any plant that you can bend around your basket without breaking will work. (Pictures of baskets in this article are made of dogwood and multiflora rose.)
Processing Materials for Making a Birch Bark Basket
The bark
When you are first learning how to make a birch bark basket, it’s best if you can use the bark you collect right away. If you let bark from live trees dry out, it will roll up and become useless. Dry bark from dead trees is much easier to work with and is actually about the same as when you take it off the tree.
The roots
The first thing to do with the roots is to scrape the bark off of them. I use the back of my knife and my thumbnail to remove the bark.
Split the roots down the center so they are easier to work with. To split the roots, start by making a cut in the center of the root with your knife. Then pull evenly on each half of the root to keep the two halves the same size.
You can wind up your roots and store them until you need them. Just be sure to soak the roots for an hour or so before using them.
The rim
I always make my rims from fresh-cut saplings because they are so easy to work with, but they shrink a little bit. You can cut your rim material ahead of time, let it dry out, and then soak it before you use it. Give your rim material about 12 hours to soak.
You need to split your sapling to make an inner and outer rim. You do this by making a cut with your knife in the center of the fatter end. Then carefully pull evenly on both sides of the rim so the split stays even.
How to make a birch bark basket pattern
Study the picture below to see the basic pattern for a basket. The most important thing when first learning how to make a birch bark basket is to make sure that the tabs that stick out beyond the half circle reach to at least the center of the half circle when folded in.
This is how to make a birch bark basket pattern. Be sure your tabs are long enough!
Sewing Your Birch Bark Basket
How to Make a Basket
Once your birch bark basket pattern is cut out, fold the basket into its final shape and use the clothespins you made to hold it together. Poke holes in a half circle where you want to sew the basket together.
Fold your basket and pin it together. Next step here is to poke holes in the bark where you will sew.
Then take a piece of root and pull half of it through the first hole. Next sew each end of the root through each hole, which means that you will be putting both ends of the root through the same hole. The second root to go through will be harder to get in, so use your awl to make the hole bigger. When you get to the last hole, simply tuck the ends in to make the last stitch on the inside.
Sew so that both ends of your root go through each hole. Note the other end of the root at the top of the picture has already gone through the hole.One side of the basket sewn together. Notice how you tie the ends of the root in.
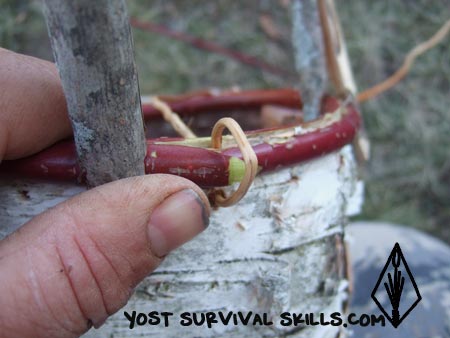
How to Make a Rim for Your Birch Bark Basket
The most important thing about your two rim pieces (inner and outer) is to taper both ends so they match up and don’t create a bulge in the basket.
Note the slight taper in the ends of this multiflora rose rim. Taper the ends so the rim joins seamlessly.
Start by putting the inner rim on the basket since you don’t need any pins to hold it. Cut the inside of the inner rim at an angle to get a taper on that end. Then wrap the rim around the inside of the basket until the two ends meet. Make a mark on the inside of the inner rim where they meet. Next taper the cut to your mark by starting your cut about an inch beyond the mark.
The inner rim of your basket doesn’t need to be pinned in place.
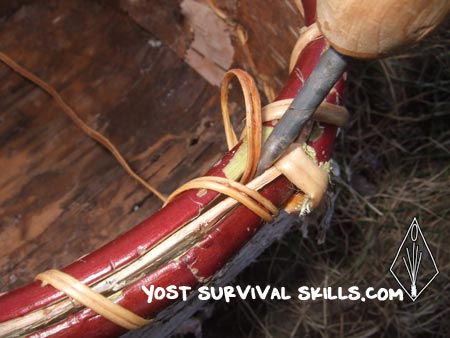
Taper the first end of the outer rim the same way you did with the inner rim. Now you can put the outer rim in place. This is a little bit trickier because the rim wants to pop off. Pin the outer rim down at the tapered end and wrap the rim around the basket. It’s really important to keep it tight against the side of the basket. Make your mark where the two ends meet and then cut the extra off with a taper. To be on the safe side, you might want to cut the rim a little long. Pin this end down with a second pin. It will stick out a little bit, that’s fine.
Both ends of the outer rim are pinned in place. This rim isn’t tight against the basket yet. You can cinch it down with your few few stitches.
Now that the rim is pinned in place, you need to poke holes for sewing it on. Make your first hole right below the end of your outer rim. (You are going to start sewing there too because the stitches will hold the rim down and you can take out that pin out.) Go around the basket putting holes in right below the rim every 1/2 to 1 inch.
Make your holes for sewing the rim on just below the rim about 3/4 inch apart.
Now you are ready to sew the rim on. Find a piece of root that goes around your basket 3 times. Three times around is extra if your holes are an inch apart but about right if your holes are only 1/2 inch apart. Start by feeding the small end through the hole under the end of the outer rim. Pull it almost all the way through until there is a short, maybe 3 inch long, tag end. Stick that tag end between the bark and the inner rim.
Start the rim of your basket by tucking the big end of the root between the inner rim and bark.
Next you just sew around your birch basket until you get to that first hole. Go through the first hole a second time with the other end of the root. Take the extra root and stick it between the inner rim and the bark.
The last stitch on the rim of your basket goes through the starting hole a second time. Then the end gets shoved between the rim and bark.
Cut off the extra tag ends and you’re done!
Congrats!!! You now have a basket that will be cherished forever whether you keep it or give it as a gift. A birch bark basket really is a thing of beauty… the bark, the design, the evidence of animals on the bark… they all come together to create an amazing work of art.
This is my finished basket. I gave this to friends in Stevens Point. These birch baskets make great gifts!
And now that you know how to make a birch bark basket, you can either make more of these or learn how to make another kind of basket.
I’m not sure if you’ve heard me talk about it other places on the site, but I raise worms to make my garden grow better. I feed my worms organic fruit and vegetable scraps I get from nearby groceries.
Well, earlier this year I started getting a ton of black soldier fly larvae eating the extra worm food that I put down. For months I’ve been taking the larvae out and putting them in a bin for the birds. Which has been great for the birds and I have counted 18 different species of birds at the house. And that’s amazing because when I moved in 8 months ago there were only pigeons and house sparrows!
Anyway, yesterday I went to write an article about them for my worm website and I Googled them to find out more about them. Well, it turns out that the first page of Google has links to articles about PEOPLE eating black soldier flies.
I couldn’t resist and I clicked on a few of the links. Within an hour I was out in the garden collecting the larvae for dinner. 🙂
And let me tell you, I’m excited about the possibility of actually raising black soldier flies because they are a great source of fat and protein. Those are the two main nutrients my vegetable garden doesn’t give me. It would be amazing to get 80% or more of my food from the garden and eating black soldier flies might make that possible!
I took pictures of the process and you can follow along as I prepare them.
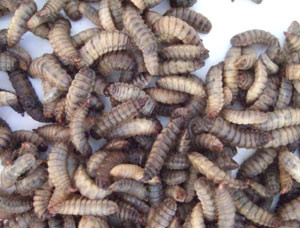
Mixed in with dirt and my worm food, these larvae have to be washed before I make dinner out of them.
Here are a few black soldier fly larvae in the garden. They eat just about any plant or animal. In my garden they only get the discarded fruits and veggies from the local grocery stores, but there is a video of the larvae eating 2 trout on YouTube that is both fascinating and horrifying.
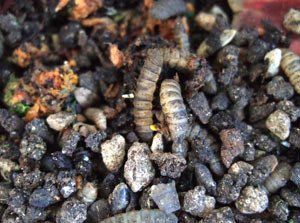
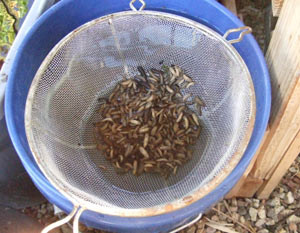
Even though this is the first time I’ve harvested black soldier flies to eat for myself, I’ve been collecting them for the birds for 8 months. The first thing I do is scoop up a bunch of fly larvae along with some dirt and sift them so the big chucks of worm food get filtered out.
First I sift the soil to get the big stuff out of it. The larvae will crawl through these 1/4 inch mesh.
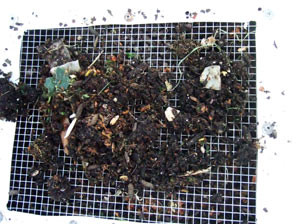
The container below this tub has 1/8 hardware cloth, and most of the black soldier fly larvae can squeeze right through that if I give them 15 or 20 minutes. That makes it easy to separate the bugs from the dirt in the tub above them.
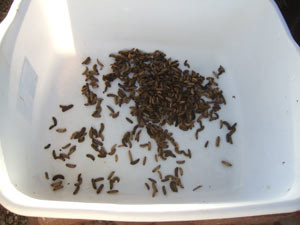
Next, I put the larvae in a strainer and washed them in a 5 gallon bucket.
After I separated out the flies, I put them in a strainer and rinsed them. Since they live in my garden soil, they had a lot of dirt on them. I’ve learned that you can raise black soldier fly larvae in sawdust though. If I end up doing that, I won’t have to worry so much about rinsing them.
I put the fly larvae in a tub while I got things ready in the kitchen.
Once I rinsed them off, I dumped them in a white tub while I got things ready in the kitchen. I discovered that they poop a lot. So I left them in the tub longer than I needed to so they’d poop more, then I rinsed them again.
Now it was time to cook them.
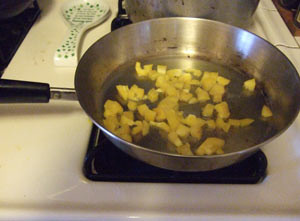
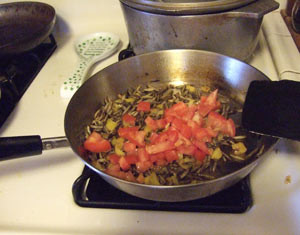
Now for the cooking. First I fried some yellow bell peppers.
In the kitchen I sauteed some yellow peppers first since I figured they’d need to cook a while.
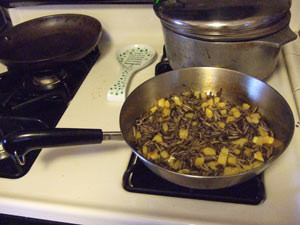
Next I added the black soldier fly larvae.
Then I added the worms. It was interesting. They smelled absolutely delicious, kinda nutty. But when they got too hot or cooked too much, I’m not sure which, they started popping like popcorn! You can see one that exploded out of the pan in a later picture.
Adding the tomatoes to the fry pan.
Next I added some tomatoes.
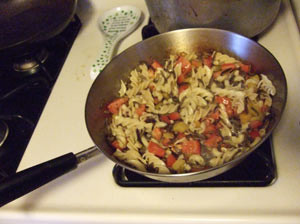
Finished meal of black soldier fly larvae!
Here’s the finished meal after adding some pre-cooked noodles my roommate had in the fridge and a bit of Cajun spice mix.
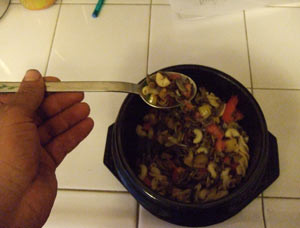
The meal of black soldier fly larvae in my favorite (only) bowl ready to eat.
Here’s the finished product in my bowl ready to eat.
Taking that first bite… it smelled delicious, but you never know.
Trying the first spoonful.
I am really happy with the way this turned out, as you can tell by that dopey grin.
That is amazingly good! Every bit as delicious as it smelled while cooking.
Overall, I’d say this was a huge success and I really enjoyed eating black soldier flies. This was a great meal and I’m definitely going to try some other recipes with these little bugs.
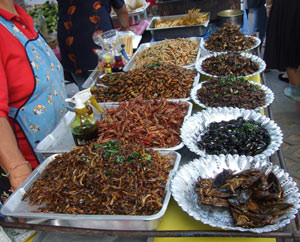
In Southeast Asia, eating insects is normal. This is at a typical market.
Eating insects isn’t all that popular in the United States, but I’ve eaten a lot of bugs in my travels. It’s interesting that in the US we only think of eating insects in survival situations, but arthropods are served as main dishes or side dishes in many countries.
When I taught high school biology back in Wisconsin, I had one of my classes make mealworm cookies. (I think the Home Economics teacher is still pissed at me for using her ovens.) I got the idea from the Food Insects Newsletter, which is no longer published, but the archive is in the link above. I can’t say the lesson was a big hit, but some kids really liked them. It opened the kids’ horizons just a little bit. I still get comments about that 15 years later.
I’m fortunate that as a kid out on survival stays I used to eat slugs and worms because I didn’t know what else to eat. I say “fortunate” because after eating chewy, gritty, hair covered earthworms, eating insects seems like a treat. They are delicious! They taste great. And sometimes when you bite into one, you get an explosion of flavor. It’s incredible.
Disadvantages to Eating Insects in a Survival Situation
One drawback to eating insects is that they almost always have to be cooked. I’ve seen people eat grubs raw, and that might be okay. But insects carry diseases and to be on the safe side, it’s better to cook them.
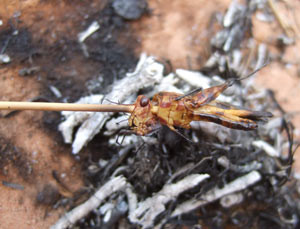
This grasshopper, roasted on a grass stem over a tiny fire was incredibly good.
Another thing about eating bugs is that you can’t always find lots of them at once. And the few you find at a time don’t really make a meal. Although I’ve been in situations where a single roasted grasshopper felt like a full meal.
Anyway, regardless of what I’ve read on other people’s websites about how you can “find hordes of grasshoppers or piles of grubs”, I usually find them one-by-one. So, they usually get added to a soup or stew. Sometimes I’ll roast them and eat them alone or power them into a tea for a little extra nutrition.
Regardless of the need to cook insects and the fact that it’s not always possible to find lots of them at once, bugs are GREAT when you’re out on a survival stay.
Great Things about Using Insects for Food
First of all, you don’t need a license to kill and eat them. This seems silly but on a lot of the survival stays I do, I can’t take mammals, fish or birds. I’d love to eat rabbit, raccoon, deer, bass or grouse. But if they aren’t in season or I don’t have a license, I can’t harvest them. That’s not the case with bugs. You can legally harvest and eat as many as you please. That’s a enough of a reason to learn how to gather and prepare insects.
Another advantage to eating insects is that you don’t need special equipment to gather them. No traps. No snares. No knife to build a deadfall. No tools to make a bow and arrows. No fish hooks. No nets. None of that. As long as you can walk, you can harvest insects. Sometimes this fact alone makes it incredibly practical to eat insects on your survival stays!
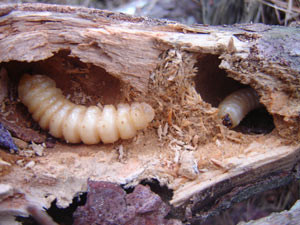
I like the taste of grubs found in trees better than grubs gathered in the soil. All are delicious though.
Also, insects are incredibly nutritious. They typically have a high fat and protein content. Fat can be especially hard to get in a survival situation. Insects supply a lot of fats, especially grubs and other larvae. In fact, black soldier fly larvae are 35% fat (and 42% protein)! That’s a lifesaver if you’re in a dire situation.
Here are the articles I have done on eating insects. Not all of these are in a survival situation, since it’s kinda fun to make them at home too.
Here are some more articles I want to write for you. I just need to wait for the right season to get pictures and video before writing them up for you:
Cooking grasshoppers in a survival situation
Gathering and eating insects around lakes, streams and rivers
Gathering and preparing grubs in a survival situation
Catching and eating cockroaches
Back to the main food page with everything you need to eat well in a survival situation
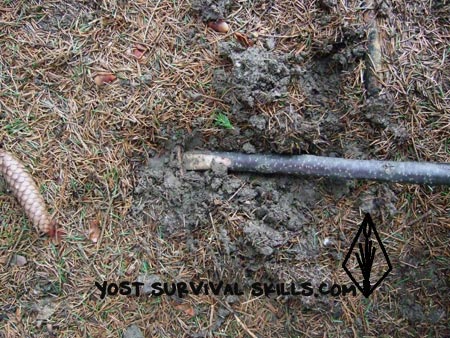
This is my latest tutorial. You’ve got written directions and a video on making a rock handhold for your bow drill kit.
Watch the video above to see me make a rock hand hold for a bow drill kit
Making a rock hand hold for your bow drill kit is a whole lot easier if you find a rock that already has a depression in it. In the video above, I take you from gathering raw rocks to making a hand hold.
You need to watch the video to see where to look for your rocks. I also show you how I choose the rocks. And you’ll see exactly how to grind the rock into a usable hand hold.
I have been all over the world making friction fires. In my travels I’ve found that the hand drill is a lot more common than the bow drill. The bow drill is a lot more complex and has more stuff to either find or carry with you.
The bow drill takes five pieces: 1) the bow, 2) the spindle, 3) the fireboard, 4) cordage and a 5) handhold. But, the hand drill only takes two: 1) the spindle and 2) a fire board.
I have a tiny rock hand hold in my big survival kit. Having it saves me a lot of time in the woods.
There are two main drawbacks of the bow drill compared to the hand drill: Cordage that is durable enough to use on a bow drill is often hard to find. And finding a suitable hand hold can be even harder. In fact, making a hand hold is such a bother that I have a small hand hold in my big survival kit.
Most of us can gather materials in the wilderness and bring them back home to work with. So, I’m going to write this post with those people in mind. If that’s the case for you, beginning your friction fire education with the bow drill probably makes the most sense.
The most time consuming process of making a rock hand hold is grinding the socket. I’ve found that using another stone and simply spinning it in the hand hold is the best method. I’ve seen people use a stone point anchored in the end of a hand drill or bow drill spindle. That works well, but I’ve found it’s hard to anchor my stone point and mine always get crooked when I apply a lot of pressure.
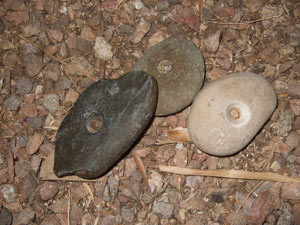
I’ve had the dark hand hold for over 20 years. Notice that you don’t need deep holes in your handholds.
There are two important things to consider when selecting rocks to make a stone hand hold with. The first thing you want to look for is a rock that already has a hole in it. Then all you have to do is make the hole bigger.
The second big thing to look for is a soft rock. You’re going to be doing a lot of grinding and you want the grinding process to go as quickly as possible. One of the best stones I’ve found for making a quick (under an hour) hand hold is hard, fine grained sandstone. Sandstone is easy to put a hole into and if you find a rock with really fine grain, it won’t wear your spindle down.
There are other things you can use to make hand holds for your bow drill kit. As I write articles about them, I’ll add those links here.
This link will take you to the main fire page with all my fires posts.
In this post I’m going to show you how to start a fire with sticks and a string. When you start your first fire by rubbing two sticks together, you are going to be amazed. It’s an incredible experience. Even after starting thousands of fires this way, I’m still in awe every time I do it.
Making a bow drill kit from start to finish
Watch the video above on how to make a fire with sticks
The video here is excellent. I go over a lot of detail in the video and you need to watch it.
Here are some important points that aren’t obvious:
When loading the spindle in the string, hold the spindle alongside the string at first, then twist it around the string.
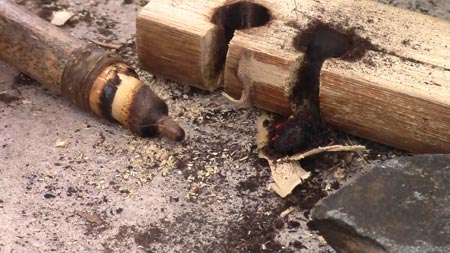
The initial placement of the spindle in the fireboard is critical. Make sure you go in about 3/4 the thickness of your spindle.
Cut your notch just short of the middle of your circle.
Make the side of your notch smooth. Otherwise the powder will get hung up on the jagged edges of the notch.
Use your bow hand to make slight adjustments to the string and vary the tightness.
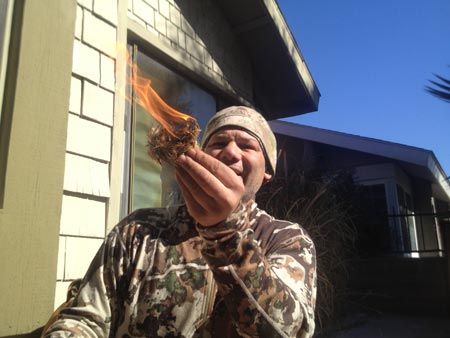
Primitive fire starting is all about using friction to create heat. You need to get most woods about 750-800 degrees before they will smolder. What you do with friction fires is spin or rub two sticks together, build up a little pile of powdered wood, and once that powder gets to 750 degrees, it forms an ember (or coal).
You then put the coal into a tinder bundle and blow it into flame. Getting fine, bone-dry tinder is really important when picking out your tinder bundle material. (Here’s a video on finding tinder bundle material in the desert.) The coal is very similar to the end of a burning cigarette, and you can practice igniting tinder bundles using cigarettes.
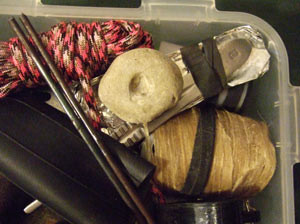
Three of the five parts to a bow drill kit. Missing are the bow and string.
Parts to a bow drill kit and a hand drill kit
The Bow Drill Kit
Probably the easiest way to start a friction fire at home when you have lots of time and materials is using a bow drill. A bow drill kit has 5 pieces to it. You’ll need:
A bow
A string
A hand hold
A spindle and
A fireboard.
In reality, finding all five pieces in the wilderness can be difficult. That’s why I prefer…
The Hand Drill Kit
In a real survival situation the hand drill will probably be your first choice since you only need two sticks:
A spindle and
A fireboard.
But, since I’m assuming you are going to start out practicing when your life doesn’t depend on success, I’m going to begin with the bow drill fire. If you want to get a bow drill kit from me, let me know and I’ll sell you one.
Starting a fire with sticks feels like a miracle every time you do it.
Technique when first learning to how to start a fire with sticks
Technique is huge when starting a fire with a bow drill. First of all, I’d suggest reviewing the beginning of video on this page and again at 12:35 so you can see how I’m positioned.
As you re-watch the video, note the following things, because they are really important:
The hand that holds the handhold is locked against my shin at the wrist. This keeps the spindle steady in the socket.
My body is directly over the spindle. This allows me to put pressure down by leaning down with my body and not pushing down with my arm.
I use as much of the bow as possible, going from end to end. This creates more heat.
The arm that holds the bow stays pretty much in the same position throughout each stroke. Keep the bow straight and level by adjusting the angle of the wrist holding the bow. If you do this right, the string will stay pretty much in the same place on the spindle during each bow stroke.
The foot holding the fireboard is bare. Being barefoot is important because you want to be able to feel what is going on with your fireboard. You have to adjust for wobbling and keep it steady.
Those are the key factors when you are first learning how to make a fire with sticks. It’s going to take some practice though. It took me over 1 1/2 years to get a coal. Just stick with it.
And of course, if you have any questions about how to start a fire with sticks, either email me or use the contact form and I’ll help you out.