Bryan Skaar on the Outdoor Channel in the Video Above. Outdoor Videography by John Yost
Bryan with a monster bull elk in Montana.
I am very fortunate that I get to shoot the outdoor videography and film hunts for one of the best hunters in the United States, Bryan Skaar. All the pictures you see on this page are of Bryan and the game he’s harvested.
Bryan and I working together has led to our hunts being aired on the Outdoor Channel. They’re on “The Hunt with Greg and Jake.”
Bryan’s Colorado muley was the biggest archery mule deer taken in the state that year.
The coolest part is that I do the outdoor videography for a show on the Outdoor Channel!!! Seriously, never in a million years would I have thought I’d have opportunities like this.
Follow your heart, my friend. And bust your ass to be the number one expert in whatever your passion is. That has worked for me anyway. I’m really good at a lot of things because I just don’t quit. I think I got that attitude from high school sports (wrestling). You win no matter what. There’s gotta be a winner… Why not YOU?
And don’t believe anyone who tells you that you can’t do something. When they say that, all they mean is that THEY can’t do it. But YOU still can. Make it happen.
After watching it slip away for years, Bryan harvested this behemoth whitetail practically outside his front door.
Hire John to do your outdoor videography
And yes, I can film your hunts and do your outdoor videography if it fits around the hunts Bryan and I do together. If you want me to film your hunts, let me know. I’m cheap as hell right now because I’m still trying to build a portfolio. But in a year or two I’ll be doing this for big bucks. I’m going to ask you to pick up my expenses, and maybe $150/day. It’s not free, but nothing like you’d get socked with from anyone else. Plus, we will have a great time!
I’ll film you and put together a finished video for you. And there’s a small chance, but still a chance, that we can get your hunt on TV. Contact me here if you’re interested.
Setting your rabbit snare with a bigger loop in a feeding area or a lay will increase your catches.
Rabbits are common in many areas and knowing how to make a rabbit snare can be the difference between eating and not eating in a lot of cases. In this article I show you how to set a survival snare for rabbits.
Where to Set Rabbit Snares
The key to placing any trap or snare is knowing areas the animals are in. For rabbit snares, most people put them along trails. I think that’s a mistake for two big reasons. One, it’s easy to catch non-target animals (though you can eat anything). And two, you don’t have as many opportunities to snare rabbits on a trail because they jump along a trail rather than walk along it.
I prefer to set my rabbit snares and traps where they are feeding, in hiding spots, or in their lays.
If you’ve spent much time watching rabbits, you’ve seen them bolt to a hiding spot. That’s a great place to set your survival snares. The rabbit is less cautious when bolting and its head is in a predictable spot.
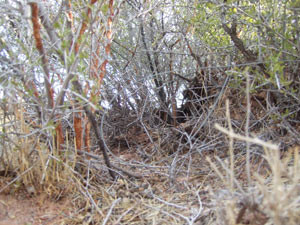
In the snaring video on this page, you’ll see that I set the rabbit snare in a feeding area. The rabbit is walking through an area like this. Sometimes, like the area that I picked in the video, the rabbit will both feed and use an area for cover.
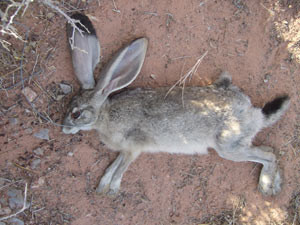
This rabbit was snared in a feeding area that doubled as a hiding spot with good cover.
I also like placing at least one rabbit snare in their lays. Lays are areas that rabbits sit and rest in. They are used over and over and well worn. You’ll see a bare spot or a rabbit-sized area where the grass is flattened. Lays are often found in thick cover or on fence lines.
Snare Loop Size and Ground Clearance for Rabbits
I think most people make their snare loops too small when snaring rabbits. I prefer to make them about six inches in diameter. What I do there is allow for the rabbit’s ears to get into the snare without the snare twisting or falling off to the side. It doesn’t do you any good if the snare doesn’t get around the rabbit’s neck.
I set my snares about 4 inches off the ground. You want the rabbit to get its head into the snare without stepping through the loop. That means that you’ll put it a little higher than what I see a lot of other people recommend. Maybe it works for them, or maybe it just doesn’t matter.
If you have any questions about how to make rabbit snares, either check out my other articles or send me a message.
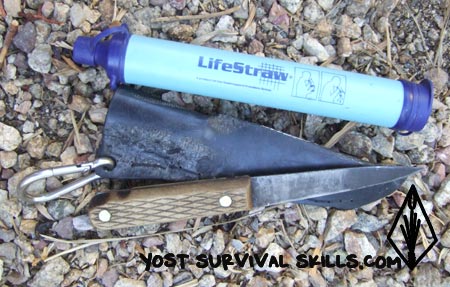
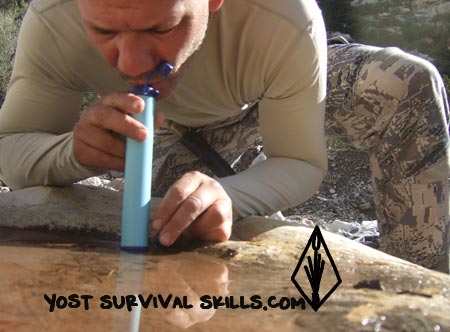
The best water purification straw I’ve used is the LifeStraw. It’s compact, easy to use and the company that makes them has a great social conscience.
This LifeStraw filter has made my survival treks a lot easier! All I take with me these days is a water purifying filter and a knife.
When I first started going on out on survival treks, I’d take a knife and a metal pot to boil water in. But there were two problems. One, I had a clunky pot banging around and getting in the way when I traveled. And two, boiling water to make it safe to drink meant that I had to start a fire.
A LifeStraw is half of my lightweight survival kit. I love that it fits so well in my pocket.
That’s all good, I can start a fire with sticks, but sometimes it’s just a pain to stop everything and start a fire. Plus, I’d have to wait for the water to cool down before drinking it.
I am really careful about what water I drink, but to be honest, most of the time I just drink the water right from the source. It’s usually too much of a hassle to boil the water. I was lucky and didn’t get sick for 25+ years. Then I drank from a beautiful spring while out trapping with my buddy… and I was camped out in his family’s bathroom for a week afterward. Never again.
Fortunately, I wasn’t in a survival situation so being sick was just inconvenient and not life-threatening. But, ever since then, I always treat my water.
I knew I needed a quick and easy way to purify my water, something that didn’t involve boiling and preferably something small enough that I could carry it with me easily.
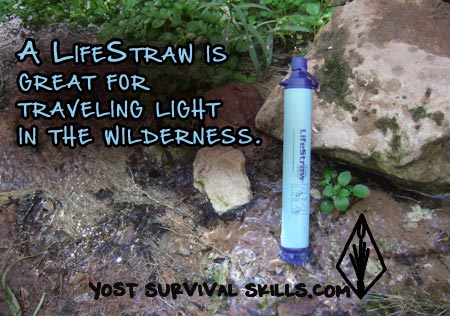
A LifeStraw is my favorite water filter to bring with me when I’m staying near a water source.
I decided to give a water purifying straw a try. And am I ever glad I did. These things are amazing. The LifeStraw especially. It’s good for something like 1,000 gallons of filtered water, it’s easy to clean and you barely even know you’re carrying it. The damn thing tucks right in your pocket and you’re good to go in five minutes.
When you come to a water source, you just pull out your survival straw and drink right from the source. Gone are the days of carrying a clunky pot around with me. I don’t need to make a hand drill, start a fire, gather sticks and make a tinder bundle to get water. I just pull out my LifeStraw and drink.
If you’ve seen any of my survival trek videos, you’ve seen me using my LifeStraw every time. I love it.
There is one major disadvantage of the LifeStraw though. You can’t use it to carry water with you. That means you have to be near a water source to use it. That’s usually not a big issue for me because when I go out, I’m usually around a lake, river or stream anyway.
How to Carry Water in Your Water Purification Straw
Actually, you can carry a little water with you in your LifeStraw. You can suck water up into your straw and cap it quick to keep the water from running out the bottom. Then put it in your pocket upside down so the water that’s in it doesn’t drain out. You can’t store a lot of water in the straw itself, but sometimes just the little bit that’s in there tastes incredibly good during a hike.
I LOVE my LifeStraw. It’s the best invention for survival skills in the 30 years I’ve been doing this.
Another tip is to suck water up into your water purification straw and let it sit in there for a couple of minutes to get the micro-pores of the filter saturated with water. Then go ahead and drink out of it like a straw. It’s a lot easier to suck through the straw if it’s already saturated.
Lifestraws are about $20 bucks on Amazon or eBay, and I highly recommend you get some kind of water purification straw for your survival kit. The link above is for a pack of 5 Life Straws and it’s a great deal. If you buy from the link, I make little money.
Another good option, though I think the LifeStraw is better in most cases, is the Sawyer water filter I talk about here.